
The art of black and white photography is surprisingly difficult to master. You can’t just slap a “noir” filter on your images and call it a day!
In this article, I will introduce black and white photography, also known as monochromatic photography, and explain how to take better black and white photos – including how to convert B&W images properly in software like Lightroom and Photoshop.
1. What Is Black and White Photography?
Black and white photography is the art of using different tones of gray, ranging from white to dark, to create compelling images. This genre has a very long history – as long as photography itself. By the time photographers captured the first permanent color image in 1861, monochrome photos had been around for 35 years.
Still, although color is the new kid on the block, it hasn’t replaced the art of black and white. Color can be a distraction; it can be dull and lifeless. One of the tasks of photographers is to simplify an image, distilling a scene down to its essence. Sometimes, that essence is colorless.
Ansel Adams, discussing the differences between the two types of photography, said, “I can get a far greater sense of ‘color’ through a well-planned and executed black and white image than I have ever achieved with color photography.”
Wow. Ever thought of it that way before?
Of course, in today’s world, the vast majority of photographs are taken in color. Perhaps this means we have lost some of the beauty and imagination that Ansel Adams wanted photography to convey. Hopefully, the techniques in this article will help you gain it back.
2. The Proper Way to Do Black and White Photography
A good black and white photo is also just a good photo, period. You won’t be able to rescue a disastrous image by slapping a “Noir” filter on it, although that’s a popular thing to try.
There are seven essential elements of top-notch black and white photographs, which you’ll see shortly. First, though, is the most important thing to remember: You need to have a reason for shooting in black and white.
Not every subject works well in black and white. So, always ask yourself: Why are you eliminating color from a particular photo? What makes it so important to shoot your subject that way?
Black and white photos can look great, but they don’t always. You need to know ahead of time why you are taking a picture in black and white rather than color. If you can’t pinpoint a good reason, maybe your photo is not meant to be monochromatic.
3. Black and White vs Monochrome
Perhaps you have noticed that there are two common terms which refer to the “same” thing: black and white (B&W) and monochrome. However, even though you may see these words used interchangeably, they are not identical!
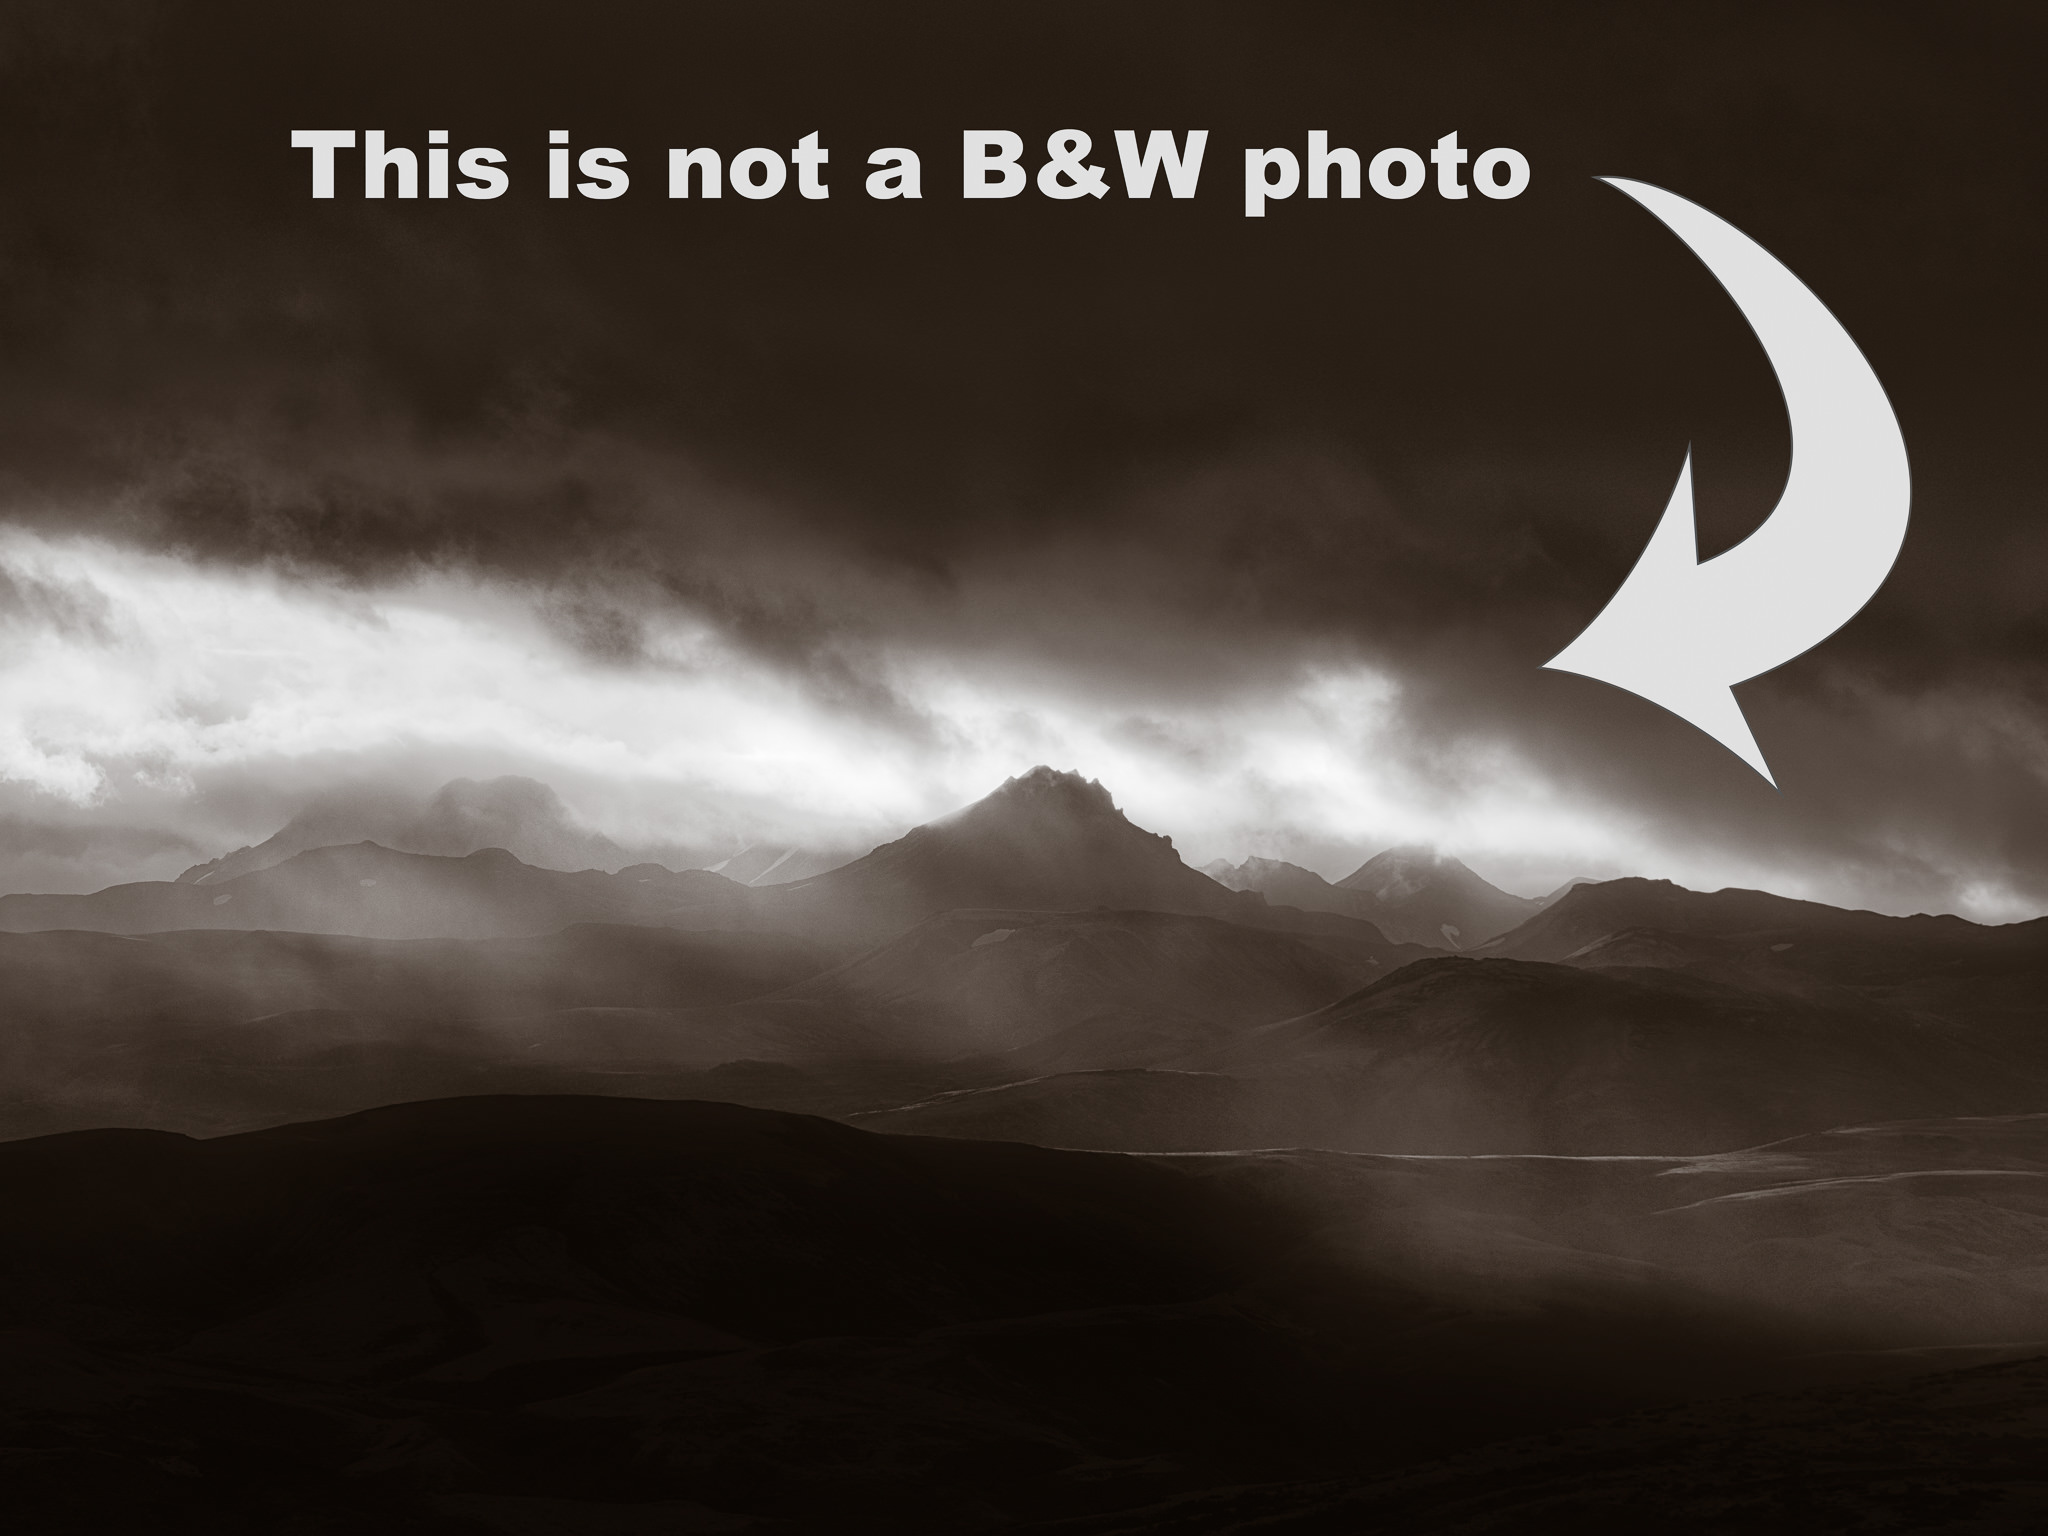
The word monochrome means “of a single color.” So, monochrome photos can have a color tint, assuming it is just one color. Take a look at the photo below. It has a brown hue to enhance the character, but all the other colors have been removed. Although this counts as monochrome, it is not black and white. True black and white photos have no color at all. They are entirely black, gray, and white.
The good news is that you generally can use either term without causing confusion. But if you want to be perfectly accurate, it is better to use the phrase “black and white” for photos without a tint.
4. Camera Equipment
In general, when you take pictures in black and white, you should just keep using the camera you already have; it will work equally as well for monochromatic images as in color. But there are still a few camera equipment considerations that matter for black and white photography, which we will cover below.
4.1. Cameras
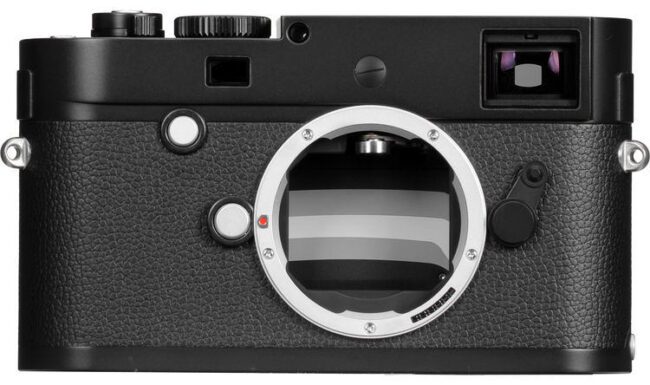
First, it is important to mention that there are some cameras which shoot monochrome photos only. They tend to be very high-end and expensive, such as the Leica M Monochrome, which sells for $8000. Although you will occasionally find people who modify regular cameras to shoot only black and white, that process is expensive and difficult to do, so it isn’t common to see.
Why would anyone go to such effort for a camera that only shoots B&W? Well, most people don’t. But monochrome-only cameras do offer sharper and cleaner black and white images than what you can get from a color camera, so it’s not as though there are zero benefits. For most people, though, the practicality of a regular color camera makes it the obvious choice.
4.2. Shooting in Black and White vs Shooting in Color and Converting
Most cameras have a black and white mode, which brings up an interesting question: Is it better to take pictures in color and convert them in post-processing, or go with monochrome mode from the start?
The simple answer is that you should always take pictures in color first, and convert to black and white later in post-production, just because there’s no real penalty for doing so. And, if you ever change your mind and want the color version instead, you always have the option to go back.
Also, if you start with a color file, you gain a huge amount of flexibility – because you’ll still be able to adjust “colors” in post-production, even after converting to black and white. For example, you can darken the blue channel to make the sky appear darker in your monochrome images. This isn’t possible if your out-of-camera file is already black and white.
4.3. JPEG vs RAW
The previous section was actually a bit of a false dilemma. Quite simply, it isn’t relevant to many photographers in the first place. That’s because – hopefully – you will be shooting RAW files rather than JPEGs, and RAW photos taken with a color camera always retain color information.
If you haven’t heard of the RAW vs JPEG debate, take a look at our specific article on the subject. But the basic overview is that RAW files have more information and image quality, whereas JPEGs are smaller files with less data. For obvious reasons, then, photographers looking for high-quality images tend to shoot RAW.
So, if you are shooting RAW, you can enable “monochrome” on your camera and start taking pictures. The images will appear black and white on the camera’s LCD screen, but when you open them in post-processing software, they’ll flip to color! The RAW file doesn’t throw away any of that data.
You can use this to your advantage. Say that you’re out taking pictures, and you expect to convert most of your RAW photos to black and white. If you enable monochrome mode, you’ll see a black and white preview on your camera’s LCD, which can help you visualize your image better. But the key is that all these photos are actually in color, since they’re RAW files, so you aren’t losing any flexibility if you later decide you prefer the color version.
4.4. Filters
When you’re learning about camera equipment for black and white photography, you may come across some information on filters. With black and white film – or if you shoot with a monochrome-only digital camera – it is important to use filters on the front of your lens to alter the contrast and tones in your images.
Take a look at the comparison below to get a sense of how color filters affect an image. These photos are taken with blue, green, and red filters – physical glass filters attached to the lens.
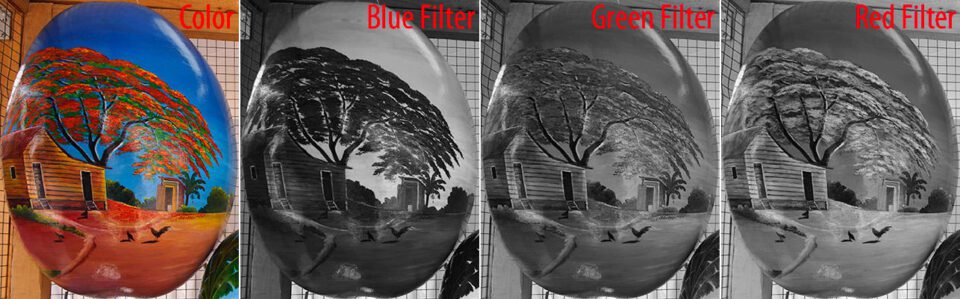
As you can see, the choice of filter has a major effect on each black and white photo. The blue filter blocks red light, darkening things like the leaves and ground. The green filter brightens everything that is green (which, above, includes small elements of the tree). Lastly, a red filter darkens the sky and other blue elements of the photo, while comparatively brightening anything that is red.
Despite the major differences shown above, digital photographers today rarely use color filters for black and white photography. The reason is simply that they have too much impact on color photos, potentially making it impossible to convert back and get something that looks good. Also, you can mimic many of the same effects in post-processing by adjusting individual color channels.
Purists still use color filters for their black and white photos, since the effects are not perfectly replicable in software. But it is becoming less and less common, and you most likely don’t need to invest in a color filter system for your own monochrome photography.
5. The Seven Elements of the Best Black and White Photos
When you shoot black and white, you need to “pull an Ansel Adams” and convey the essence of your subject – including its colors and other characteristics – through shades of light and dark alone. The best black and white photos accomplish that by perfecting the seven elements below.
5.1. Shadow
One of the first things to remember when shooting black and white is that shadows have an out-sized impact. They are no longer just darker regions of a photograph – they are major elements of composition, and sometimes your subject itself.
Your treatment of shadows in black and white photography affects every other aspect of how a photo appears. Are the shadows black without any details? That signals a feeling of intensity and emptiness. Or, on the other hand, if your shadows are subtle and detailed, it may make for a more complex photograph overall.
Note that nothing about black and white photography requires regions of pure black in order to look good (or pure white, for that matter). It is a bit of a myth that you need the complete range from deep shadows to crisp highlights before a black and white photo is optimal.
Instead, just do what looks the best to you, but keep an eye out for the shadows in your frame. They often have a stronger “pull” in black and white than in color, and your composition may need to change accordingly.
5.2. Contrast
Many people think that contrast is just the difference between the brightest and darkest portions of a photograph. However, by that definition alone, this soft gradient has extreme contrast, since it contains both white and black:

Instead, contrast also includes a component of proximity. The difference in brightness between two objects is exaggerated when they appear side by side. In the photograph below, the bright Eiffel Tower is directly in front of a black background. This image has far more contrast than the gradient above.
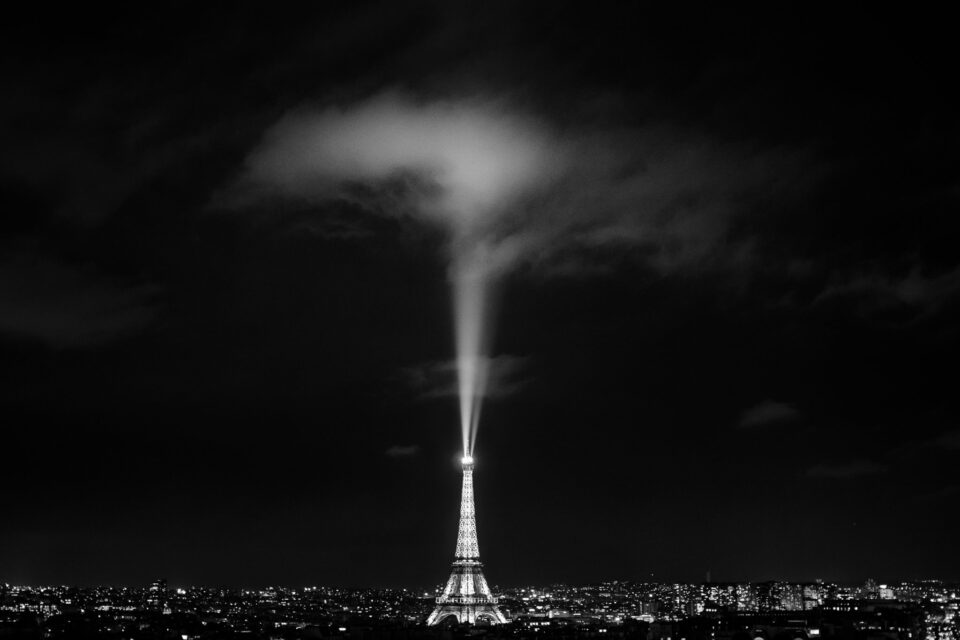
Contrast matters in black and white photography because of the message it sends. A photo with high contrast, like the one above, conveys a sense of dynamic intensity – often, again, because of the dark shadows. This is why photographers like adding contrast to monochromatic photos. It helps the images stand out.
Low contrast photos don’t attract as much attention, but their softer, muted quality can work equally well. Some of my favorite black and white photos of all time have just a few silver mid-tones, and their subtlety is what makes them work so well.

The key is that a photo’s level of contrast needs to make sense for your subject – which is something you can finesse, at least to a degree, in post-production. Perhaps it is a mistake to photograph a gentle, spring day with intense contrast that distracts from your mood. Likewise, if you are taking monochrome photos of a powerful landscape, high contrast is a natural choice in order to make the subject stand out.
5.3. Tones (Dark and Light)
Not all photographers use the word “tone” in the same way. Here, you can take it to mean the underlying brightness, darkness, and shades of gray that appear in an image.
Tones are the cornerstone of every black and white image. If you have ever heard the phrase “high-key” or “low-key” in photography, you’ve probably seen examples of tones taken to the extreme.
Although most photos are neither especially bright nor especially dark – they’re somewhere in between – you still need to pay attention to tones when you take a photo. That’s because, just like contrast, tones can send a powerful message about your photo’s mood.
Take a look at the two photographs below.
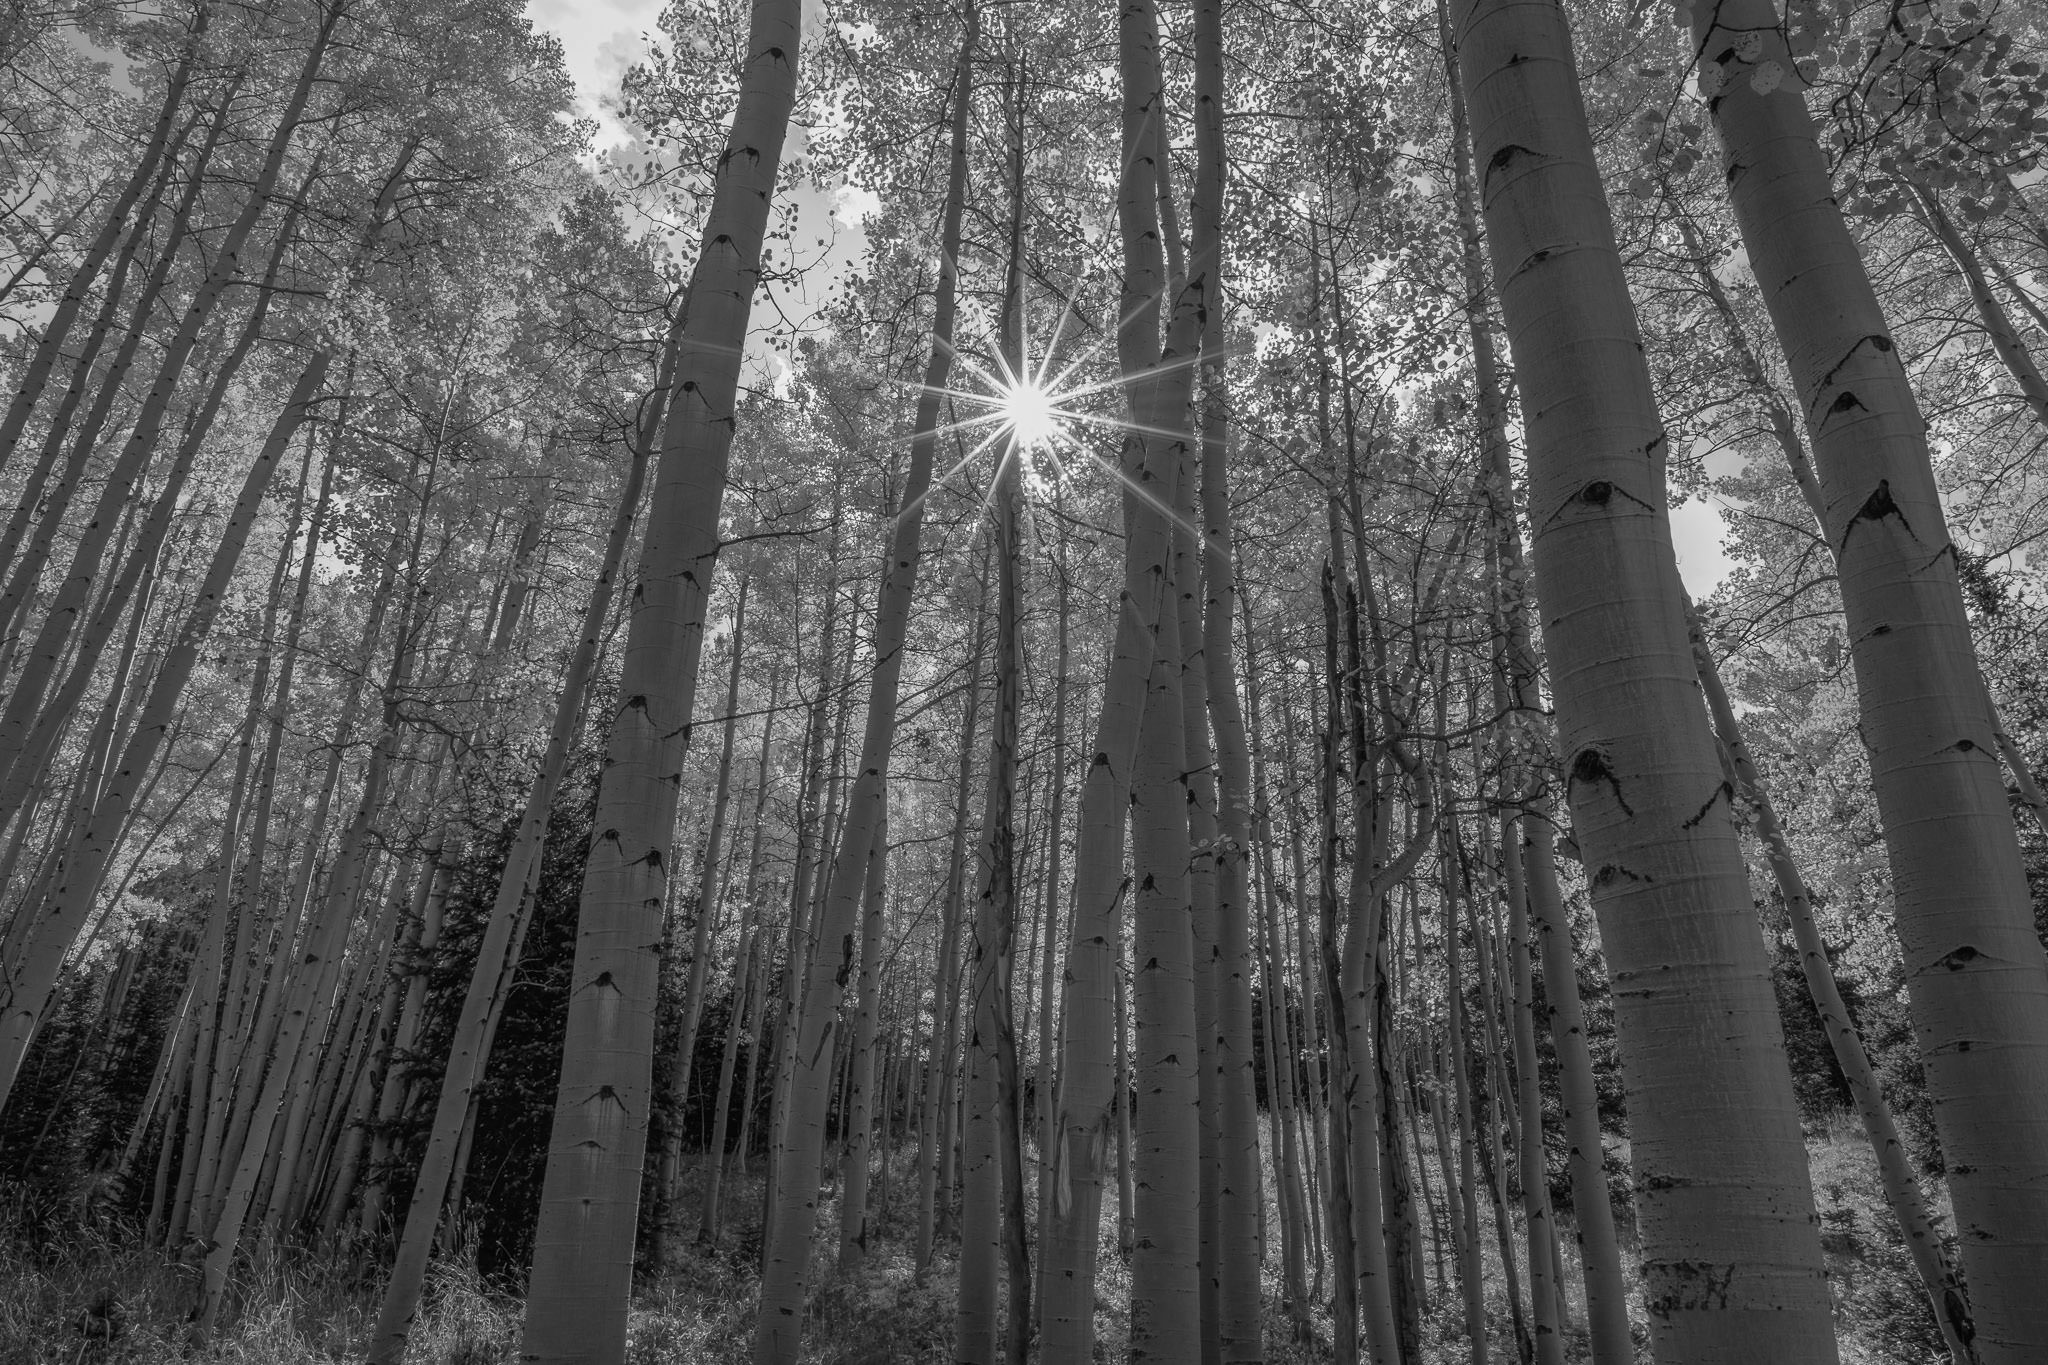
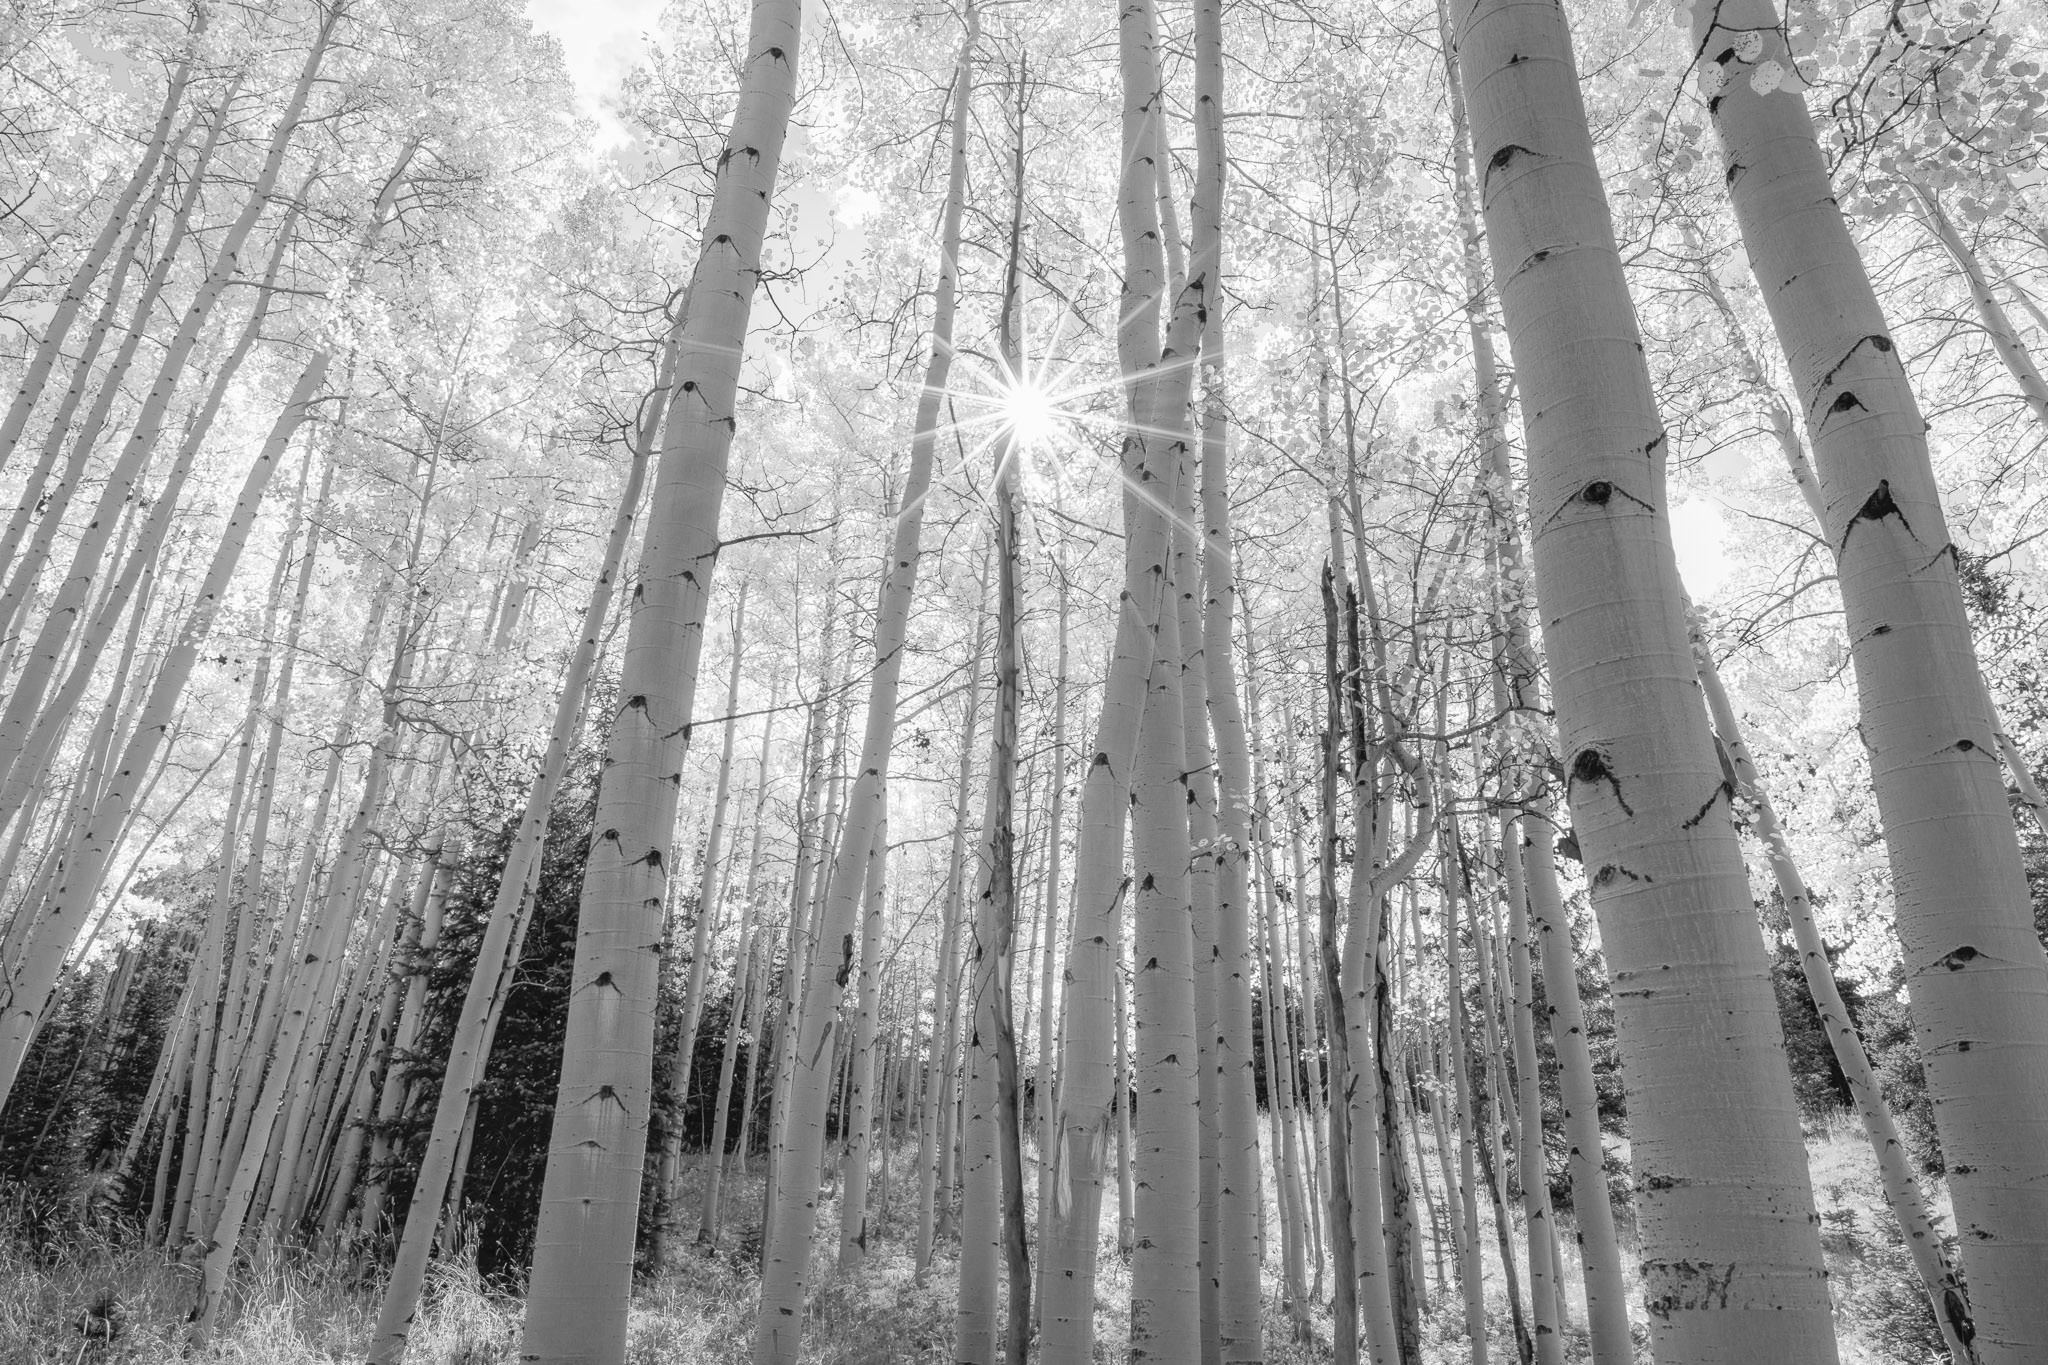
This is the same image, of course, but two different versions – dark and light. The darker image is more mysterious and foreboding. The lighter image is more etherial and happy.
Although the differences above are extreme, even tiny variations in the tones you capture can swing a photo’s emotions significantly. Personally, I like the appearance of dark, moody photographs, both monochromatic and in color. But the specific tones that work the best depend upon the scene you are photographing, and in the image above, I prefer the lighter version.
The most important thing to remember is this: The tones of your image – whether dark or bright – should harmonize with the character of the subject itself. Use them deliberately to tell the story you have in mind.
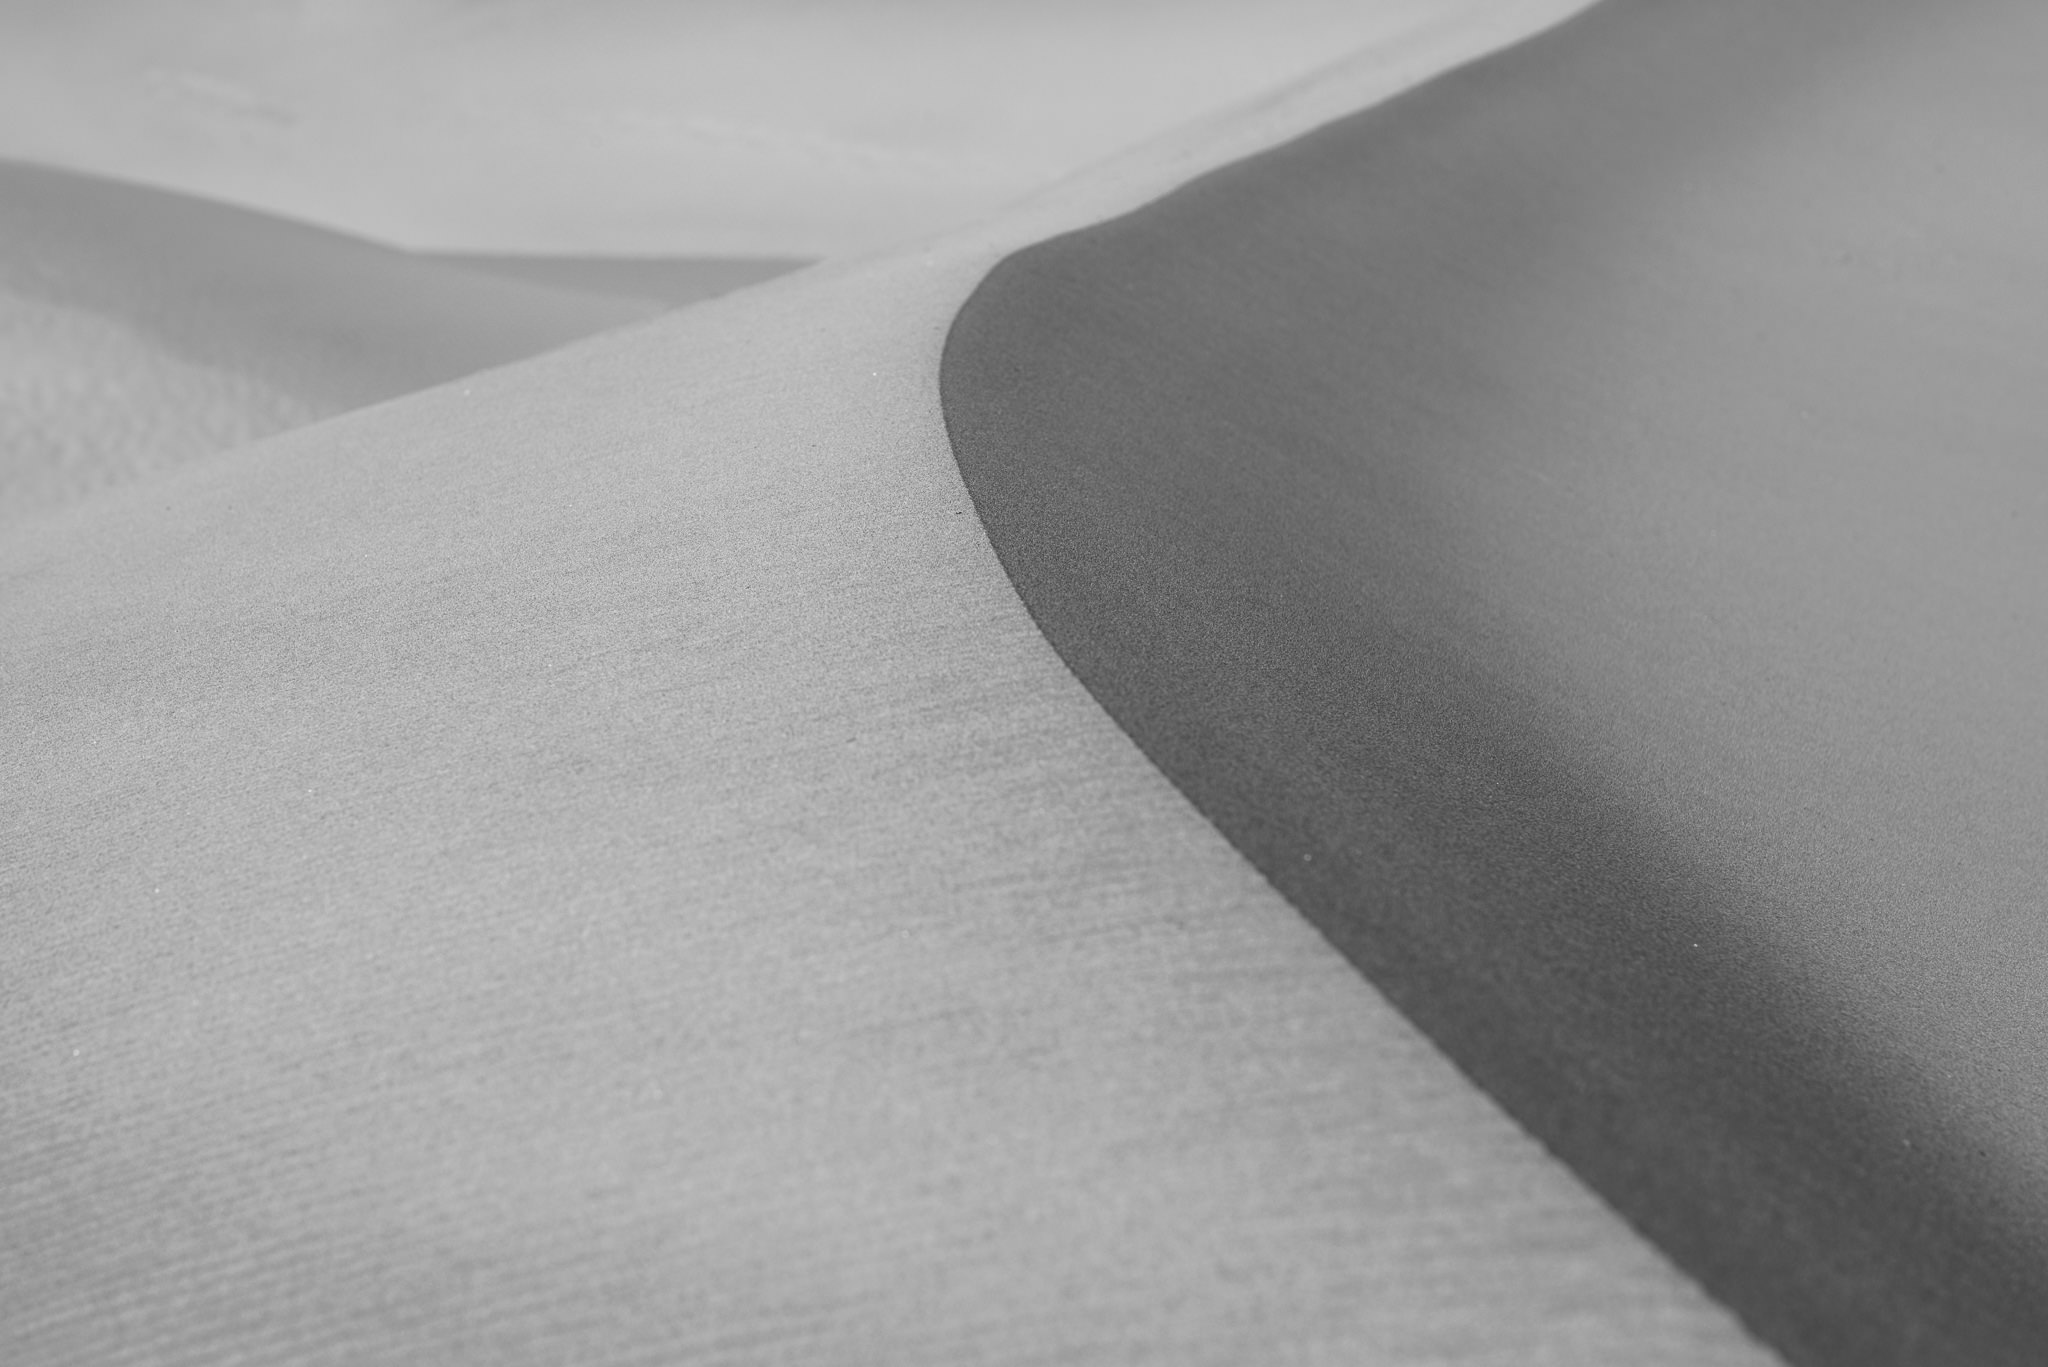
5.4. Shapes
Every photo is a collection of shapes, simple or complex. When you remove color from your toolbox, shapes become even more important as a part of the story you tell.
Take a look at the photo below. Yes, it depicts a waterfall with trees and rocks. But at a more abstract level, it is a series of shapes placed together on a canvas. The waterfall is a rectangle surrounded by lines and polygons. The large tree, anchored in the river, resembles a music note.
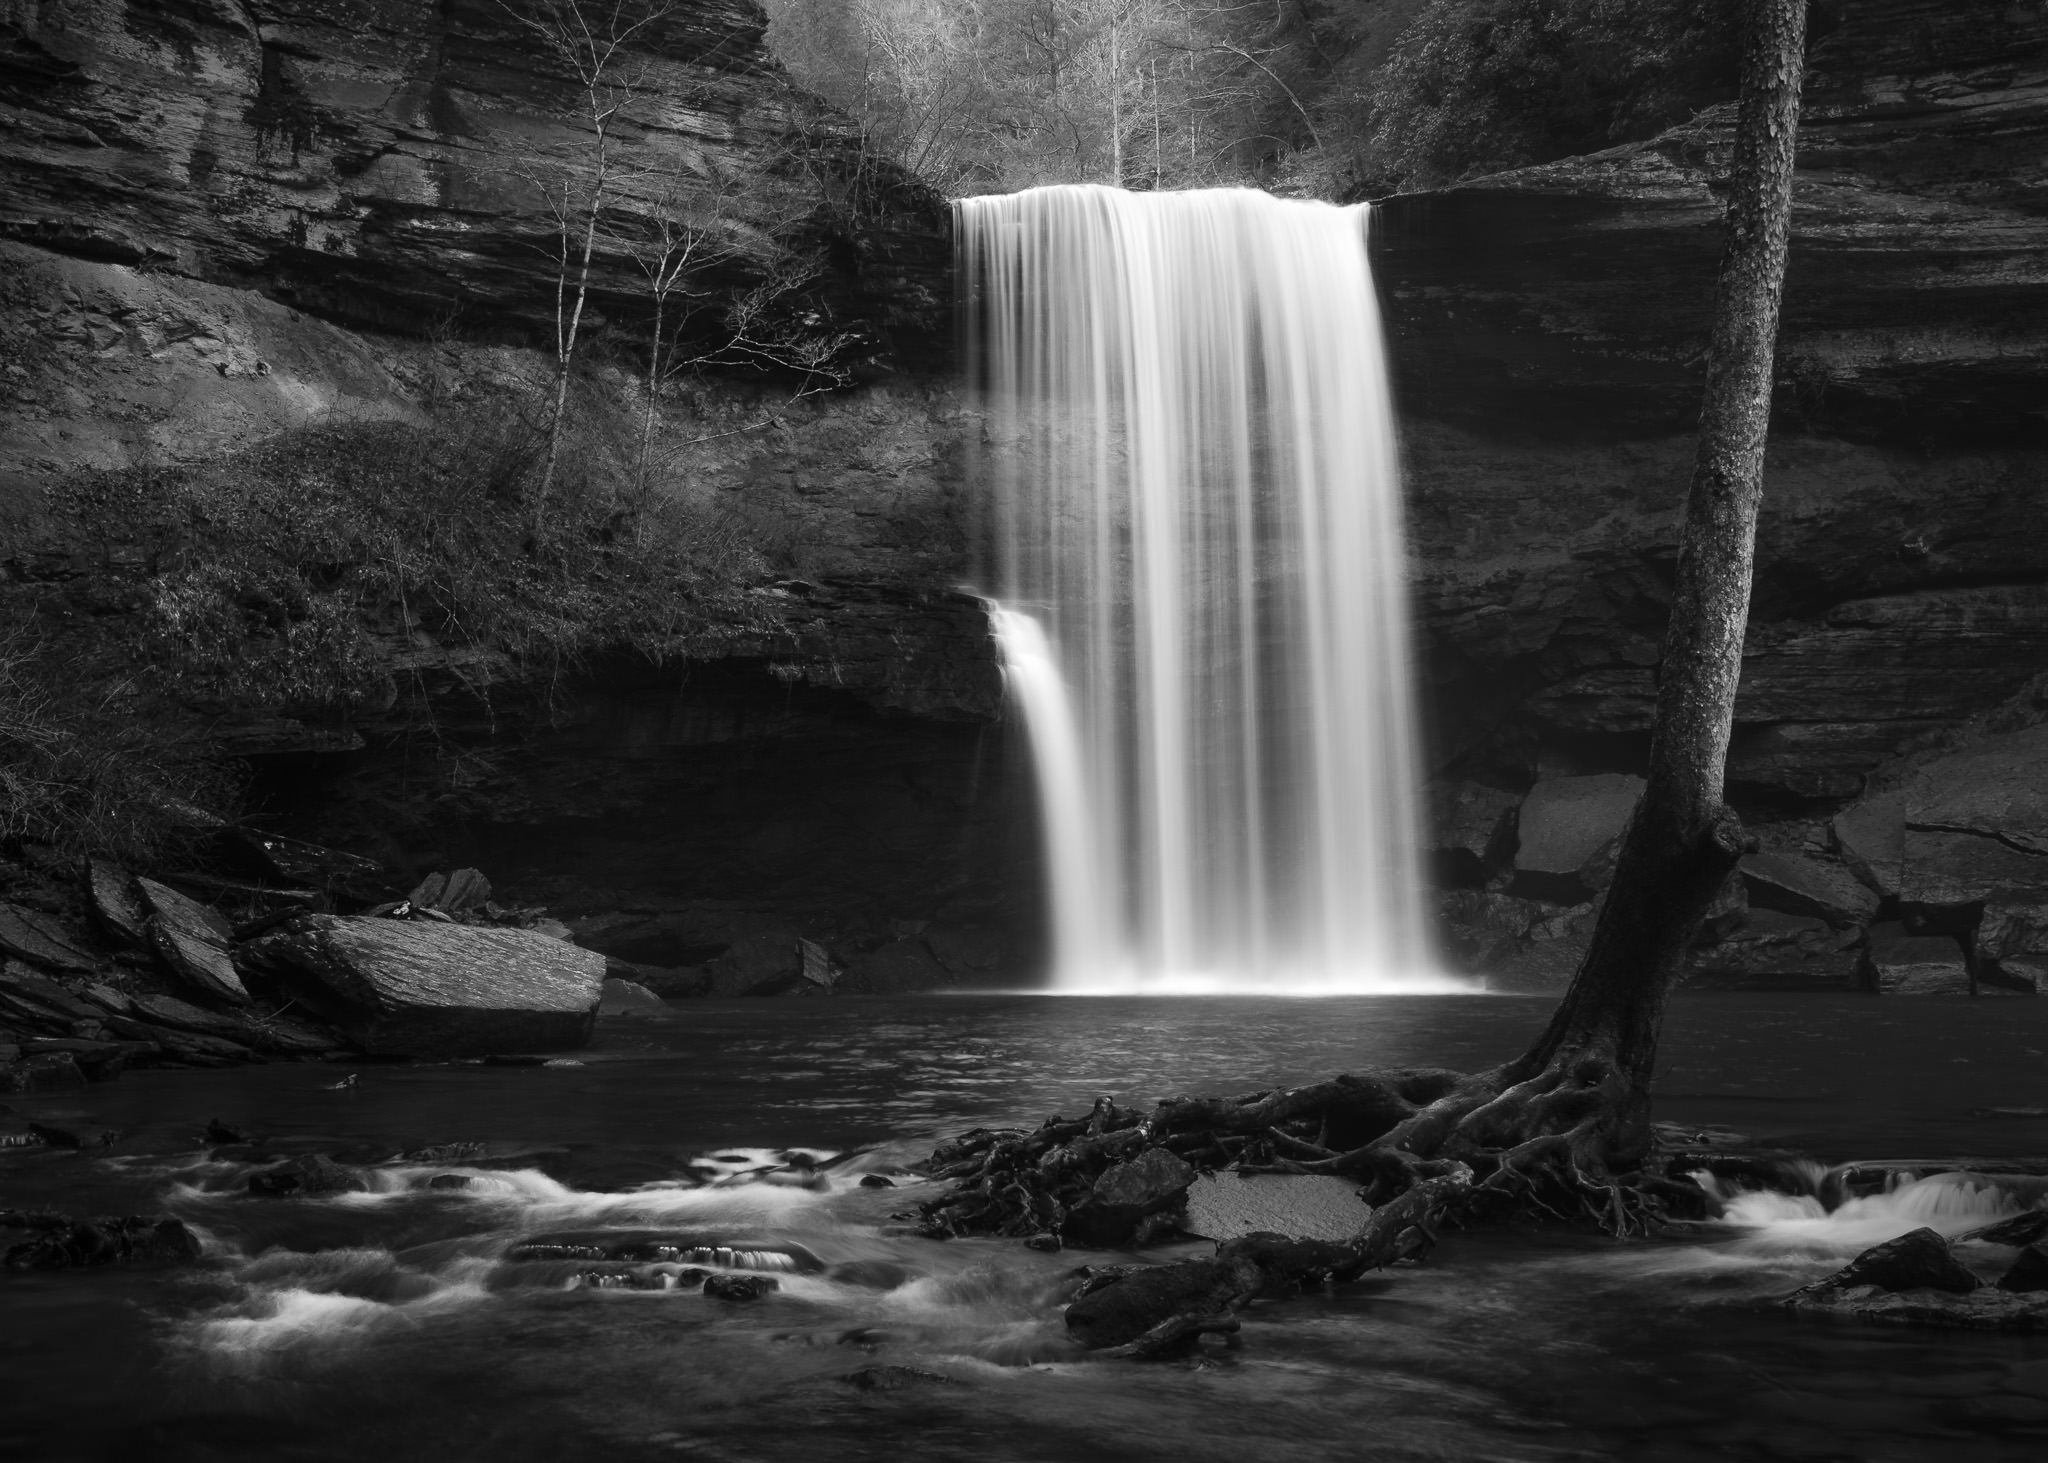
People are drawn to shapes automatically. If there is no color to an object, the only way we recognize it is by its shape. Imagine a monochromatic photo of a lamp, silhouetted. The only tones in the photo could be white and black. There are no shadows or texture to indicate what the photograph shows. But is there any doubt that you are looking at a lamp?
Shapes anchor and simplify a photograph. Some famous overlooks are photographed by thousands of people each year simply because they contain a mountain or river with a pleasing shape.
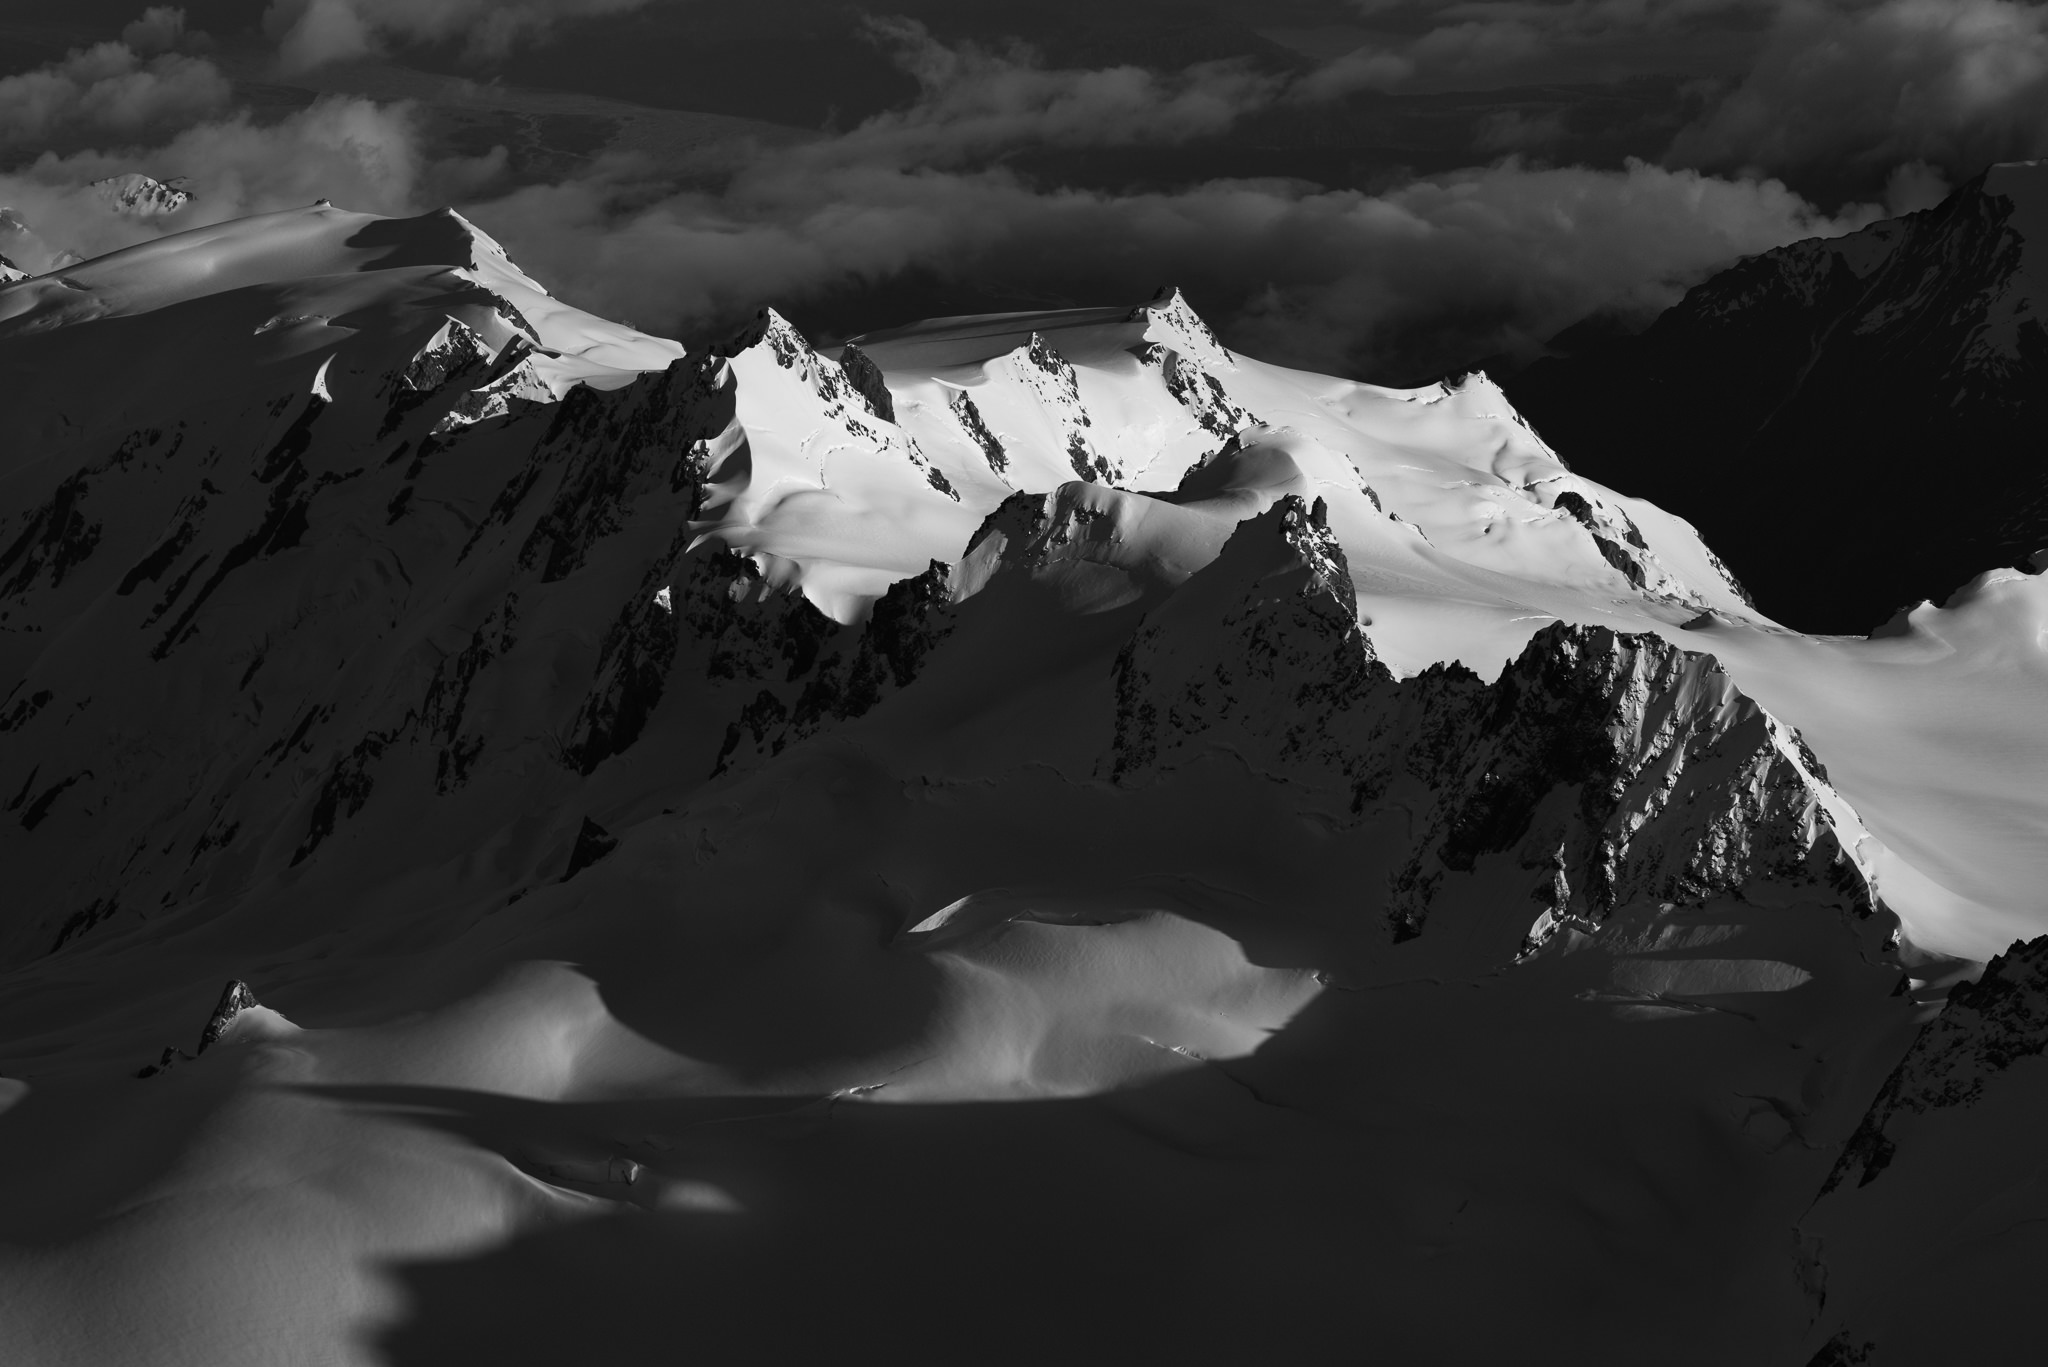
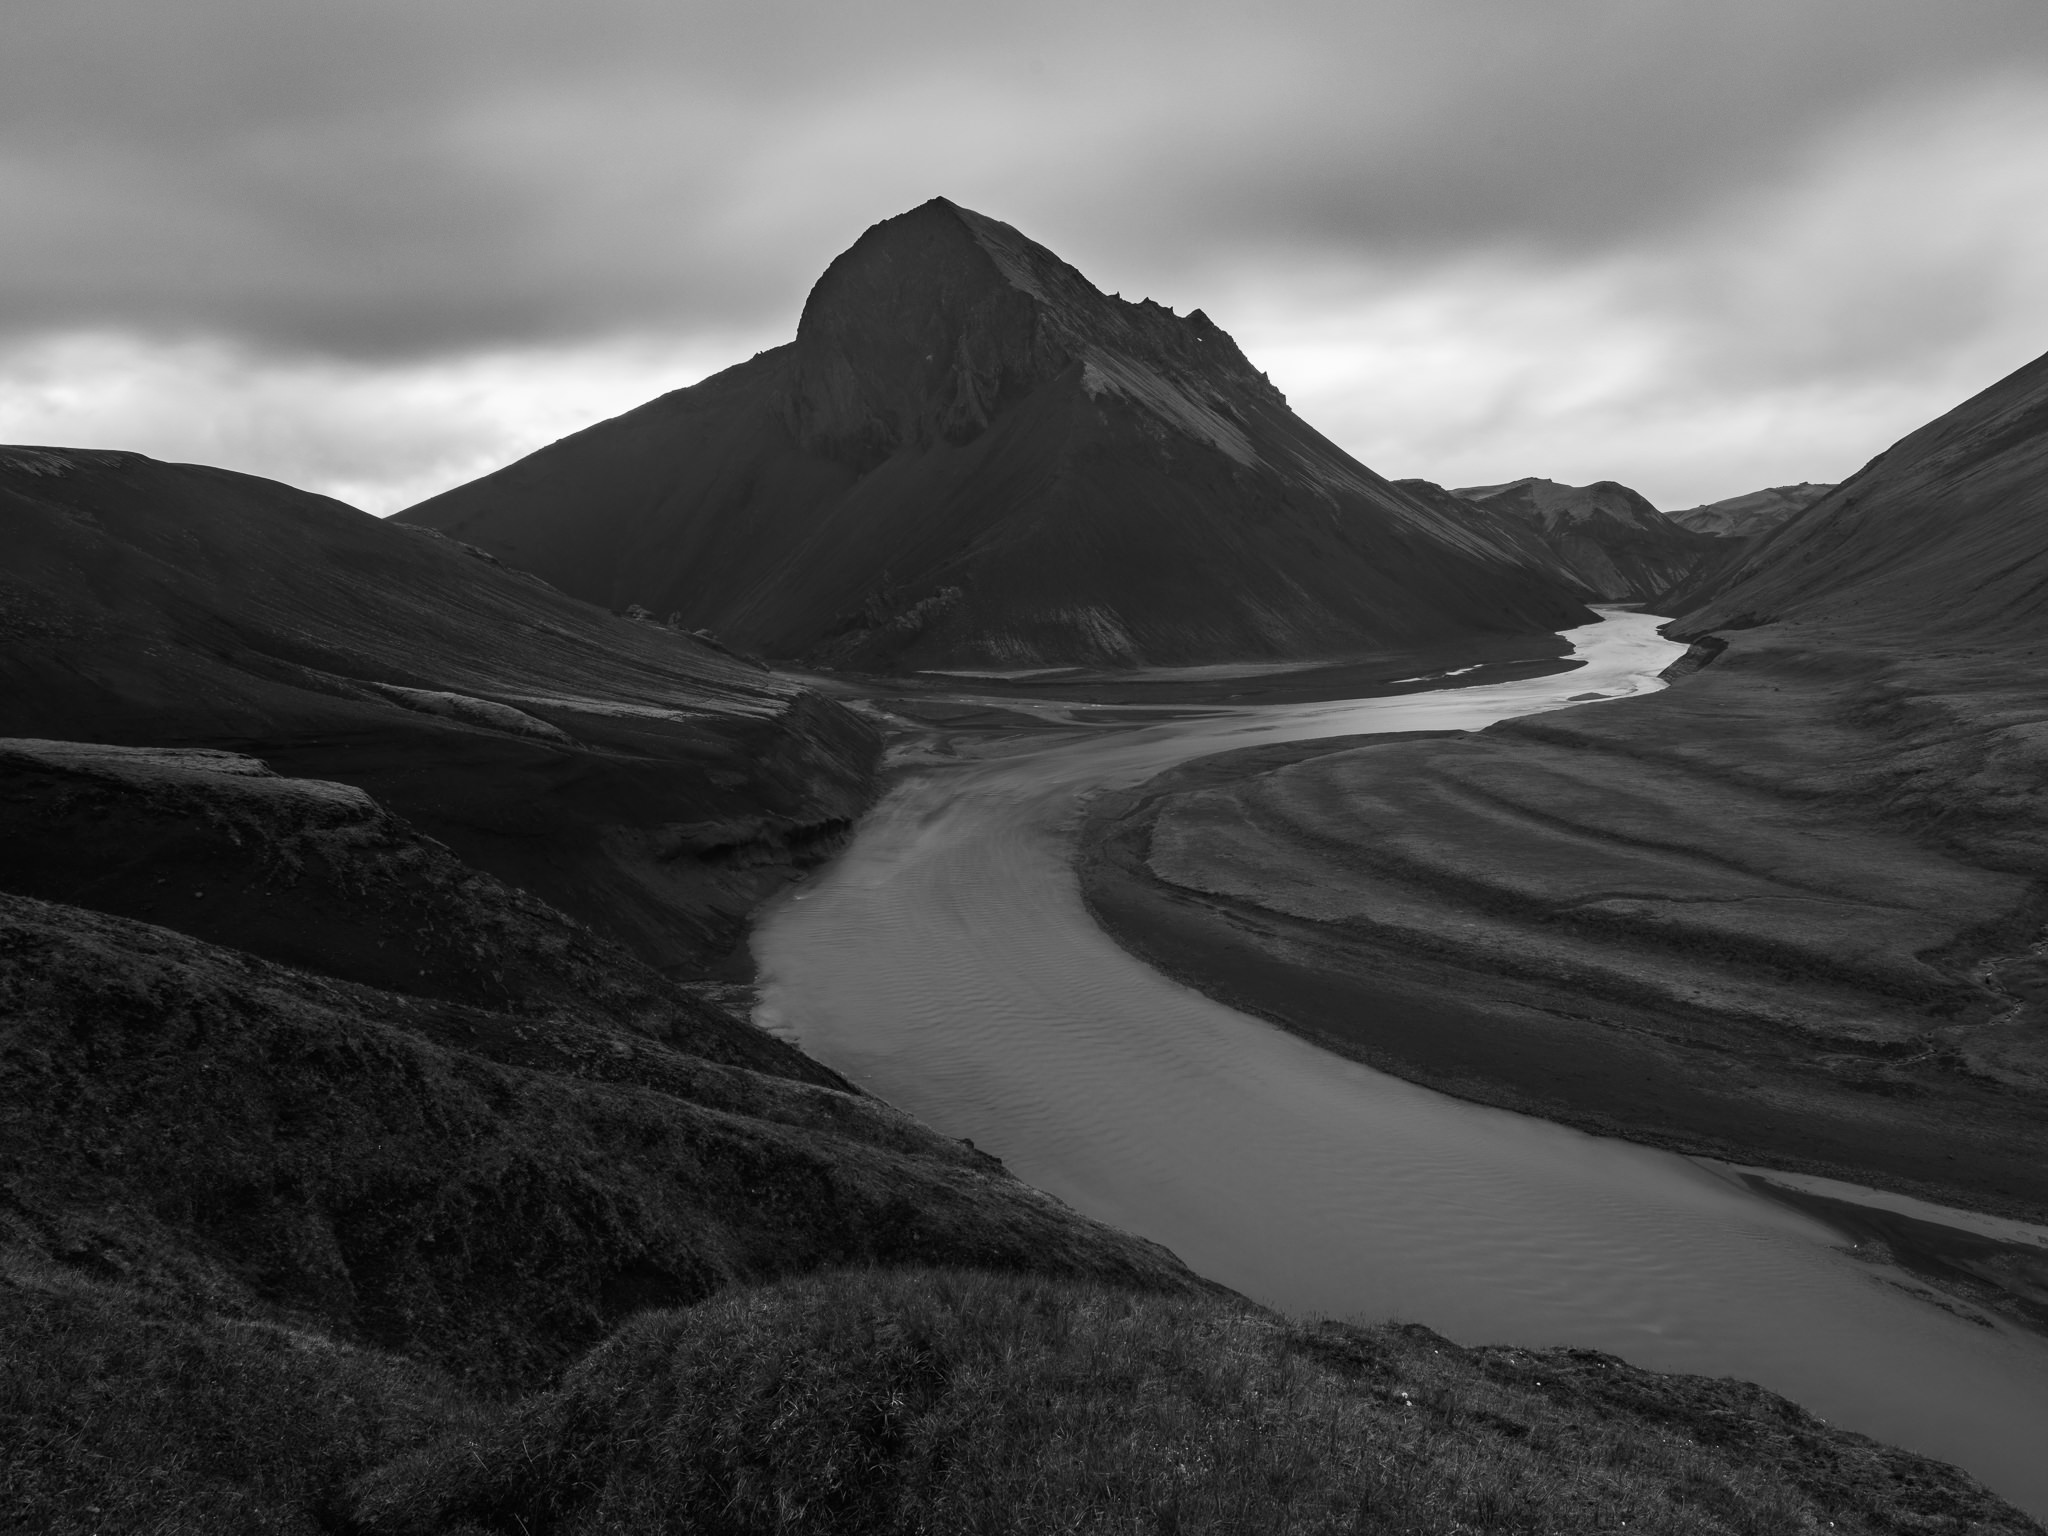
Personally, when I took the image below, I waited several minutes for fog to pass so that viewers could see the shape of the whole mountain. If part of the triangle were covered, the photo would not work well in the first place.
And do I even need to mention the shapes of people, instantly recognizable and deeply emotional?
With black and white photography, there is no color to make an image more familiar (or more abstract, if that’s your goal). So, shapes are especially important – they’re one of the primary ways for a viewer to make sense of a photograph at all.
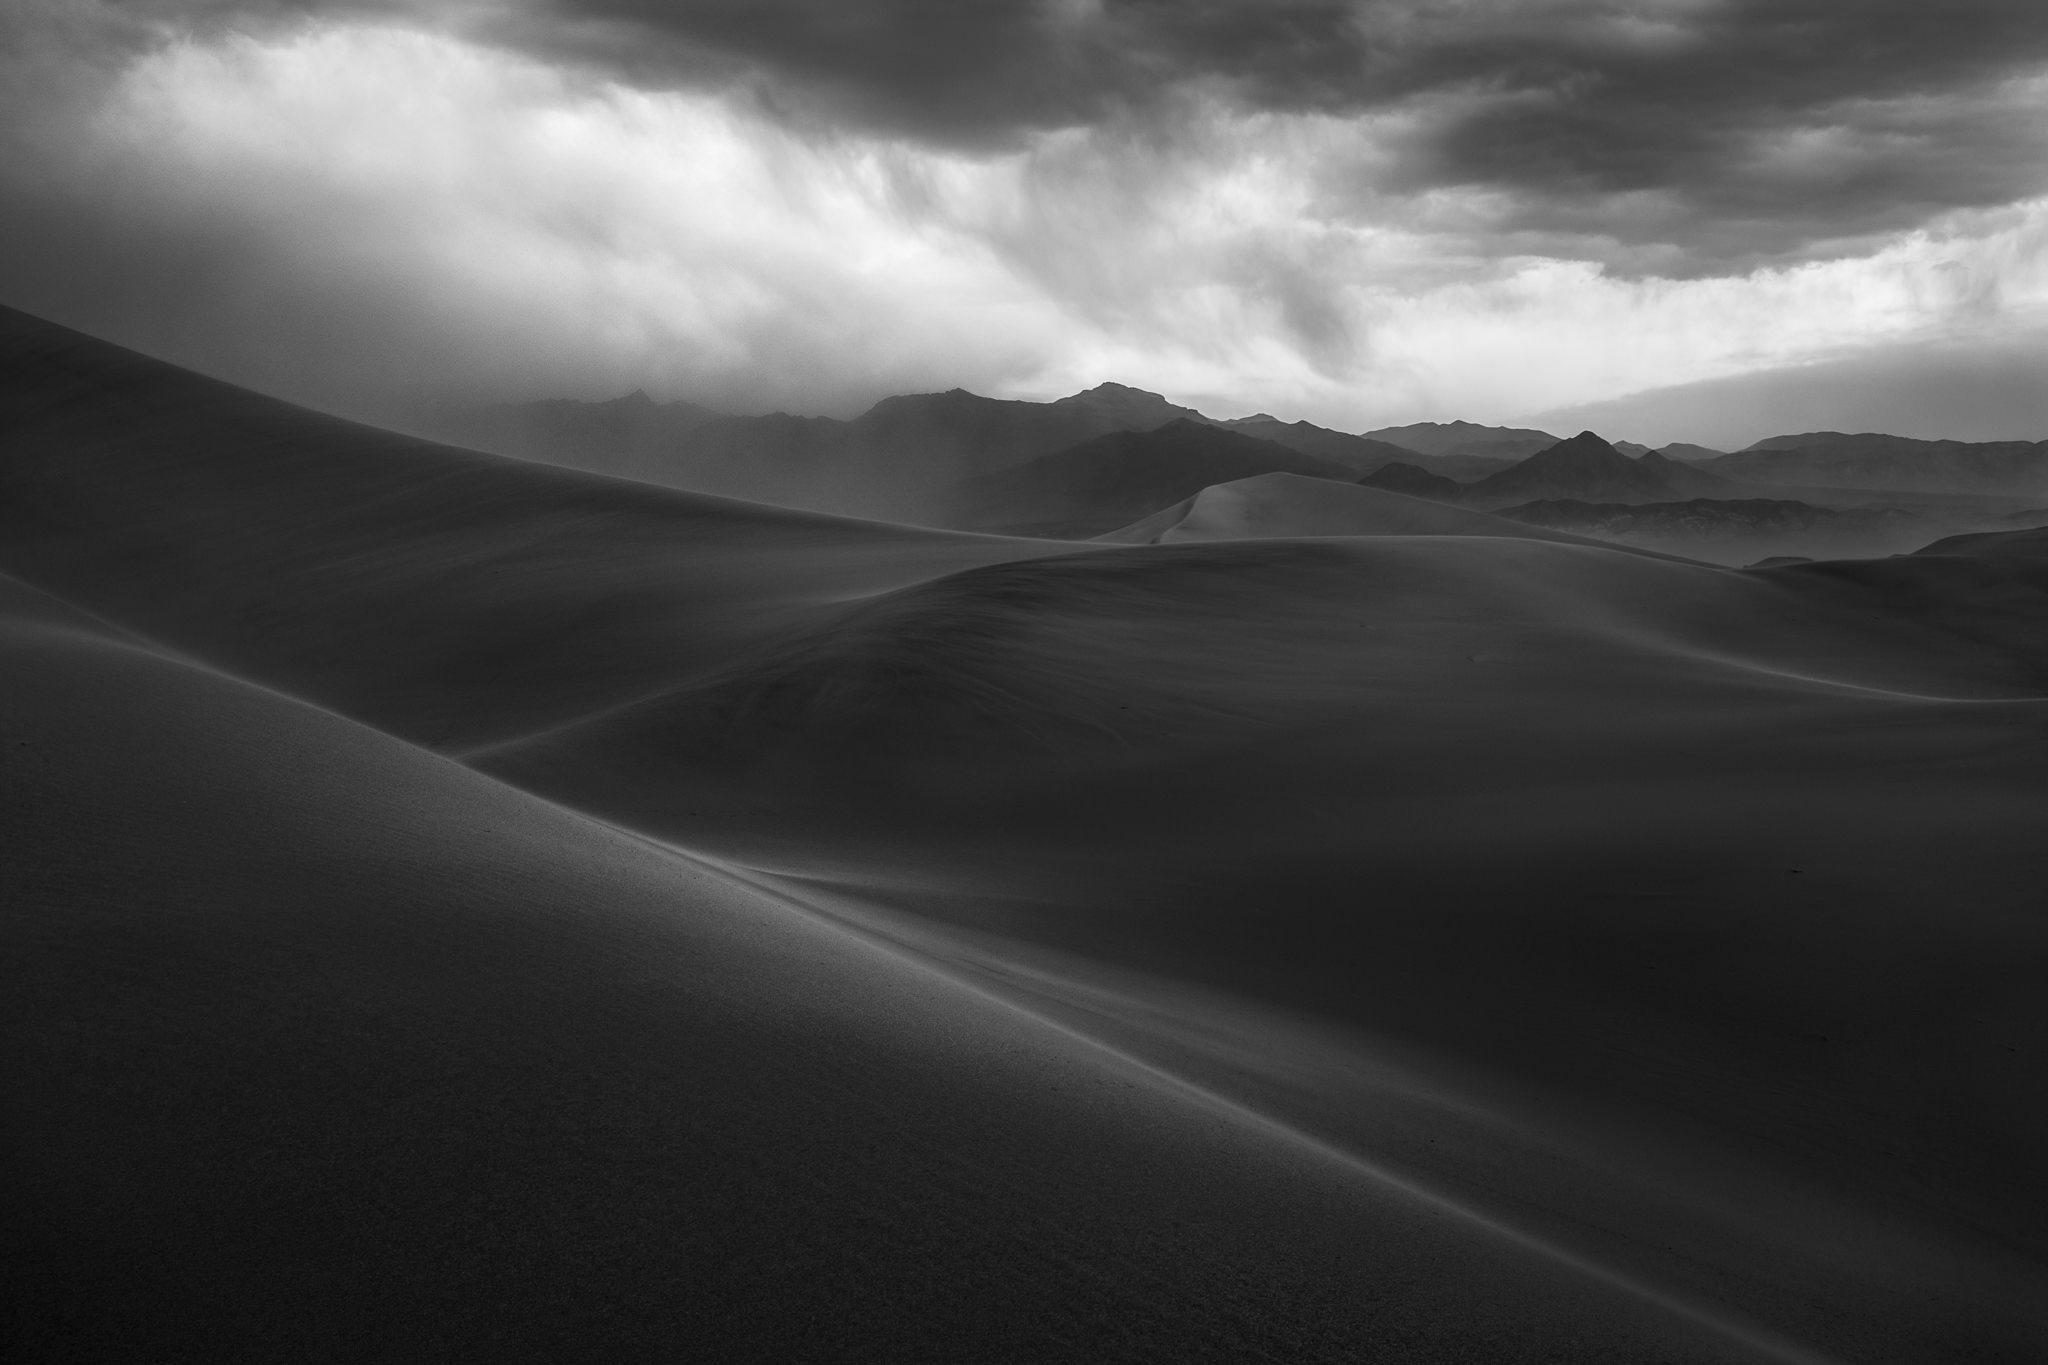
5.5. Texture
While shapes create the “big picture” of an image, texture fills in the rest. And, like all the elements of black and white photography we have covered so far, the textures you capture have the power to affect a photo’s mood and emotions.
From smooth pebbles to coarse grass, and sleek aluminum to dull rust, texture is the foundation of an image’s personality. It is very tricky to take harsh photos of a gentle stream, for example, in large part because of the water’s soft texture. (But if you did have such a goal, you might want to boost contrast and capture deep shadows – balancing out the soft texture by making the overall photo more intense.)
Take a look at the textures in the two images below, and think about how they impact the mood of the photos:
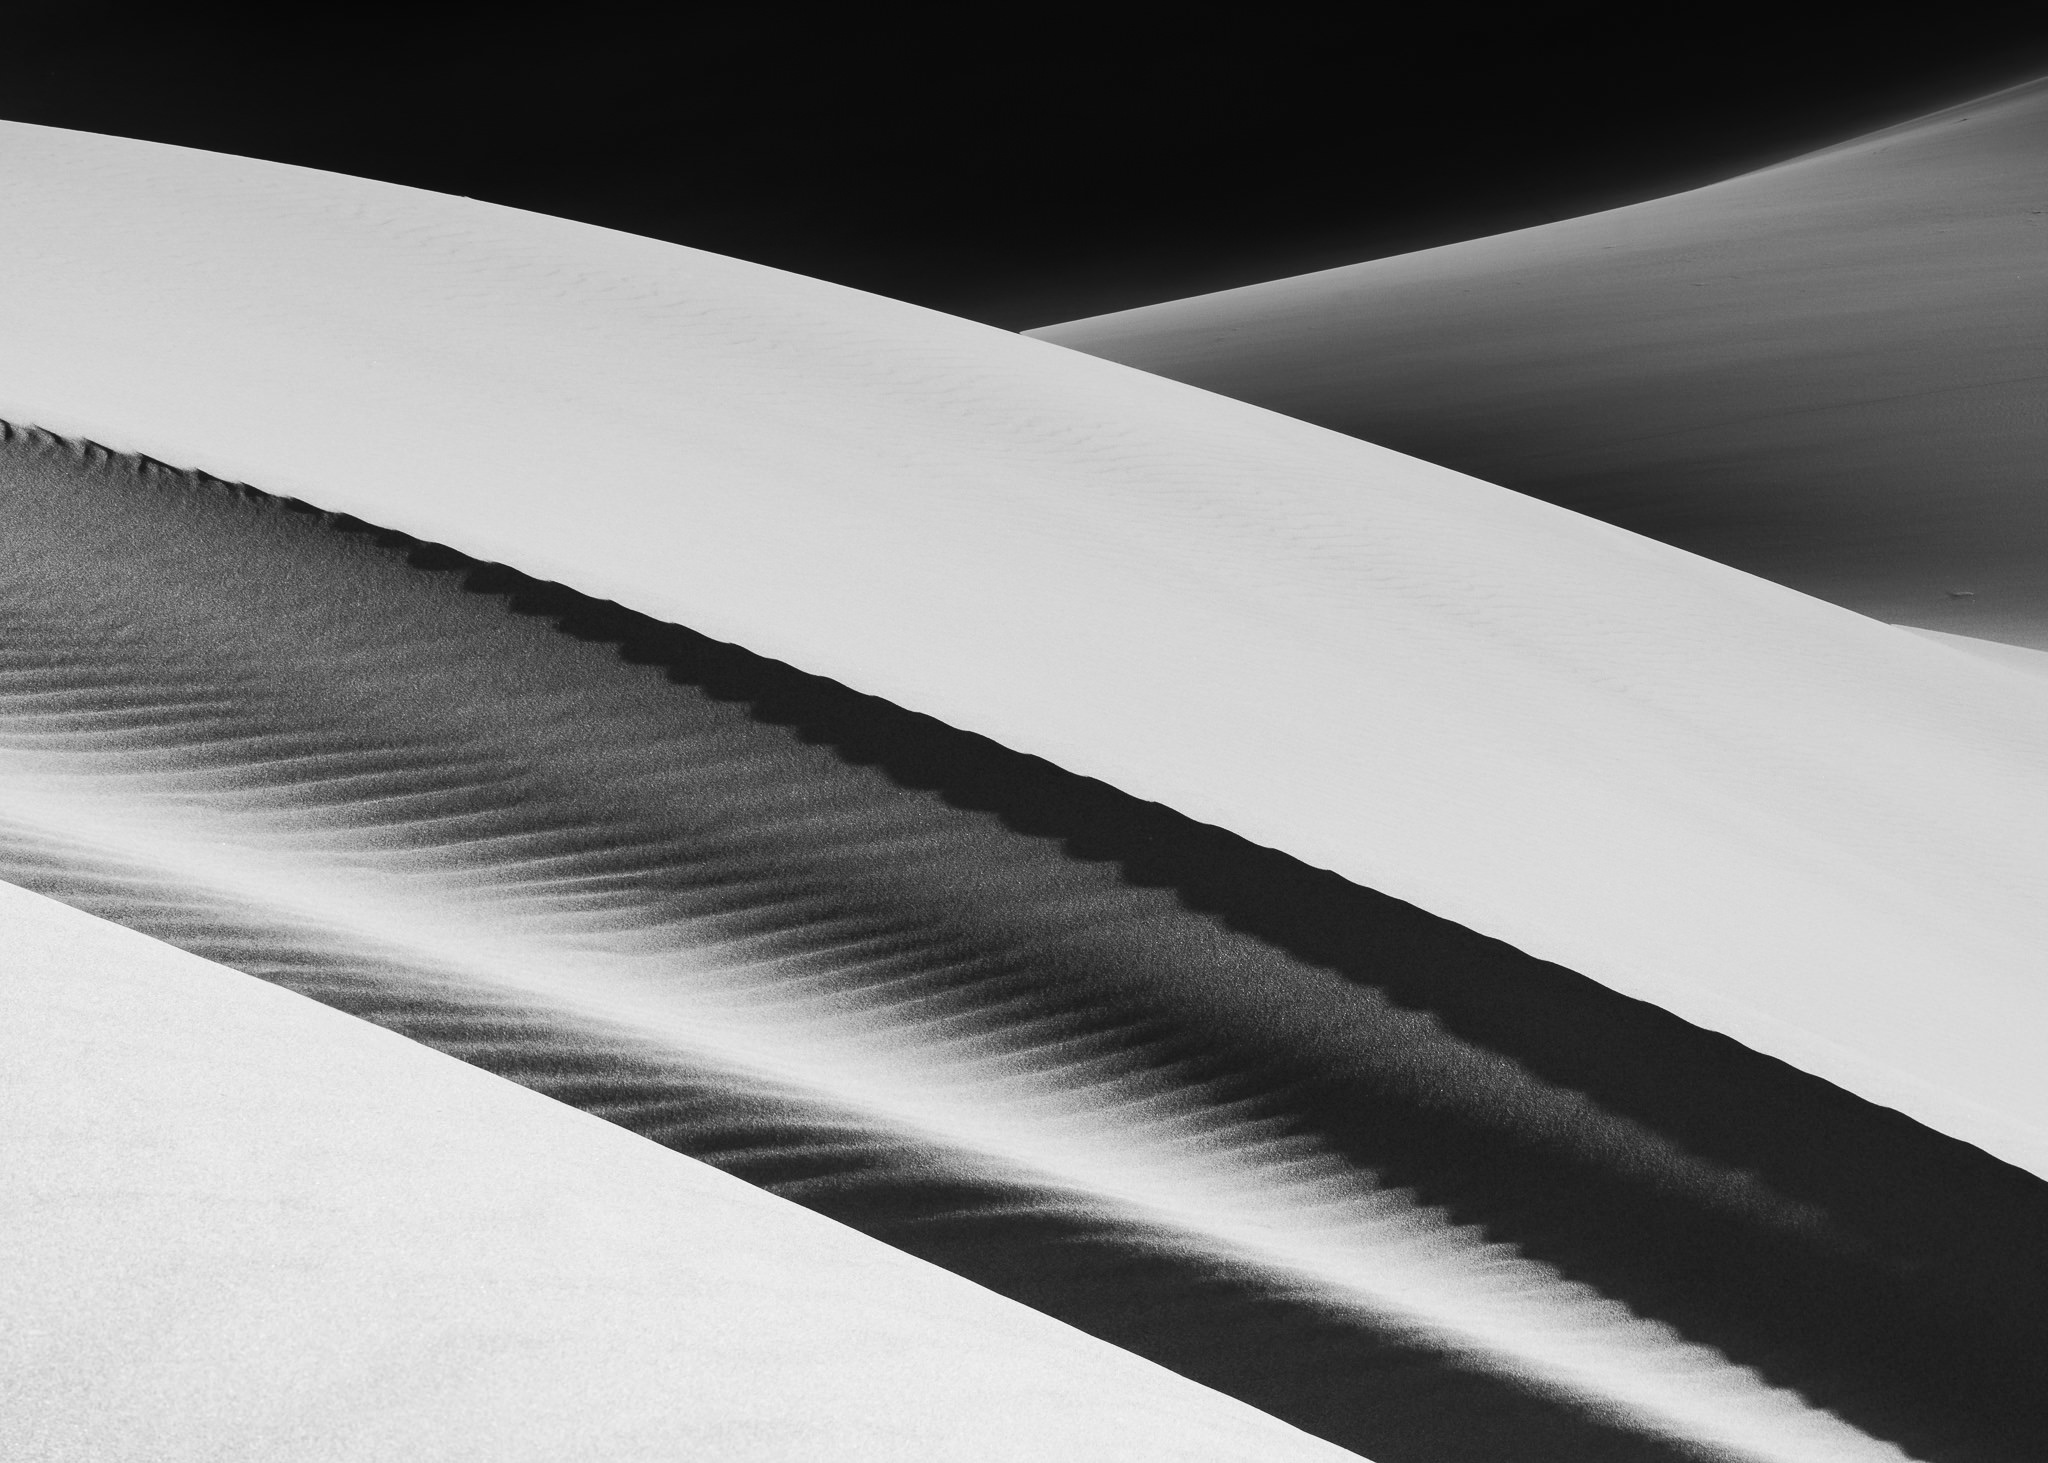
The chaotic waves in the first image add to the intense, foreboding mood. By comparison, the second photo has smoother, repetitive textures that lead to a sense of harmony and balance. When you can’t rely on color to form the emotional backbone of an image, texture is even more crucial. It simply has a major impact on the way your black and white photos feel.
5.6. Composition
The best photos tend to have an underlying sense of purpose – a hint that the photographer deliberately captured the scene in this particular way rather than another. The image has structure and order. It isn’t just a snapshot. In other words, it has a strong composition.
We have written much more extensively about composition in the past, but the key in this context is that elements of your photo will change in black and white versus color. If you are taking portrait photos in color, for example, your subject may have vivid eyes that affect your composition significantly. The same is true in landscape photography, in which case a golden sky can draw the entire image upward. In both cases, you would need to compose your photo differently if you shot in black and white instead – and these are far from the only examples.

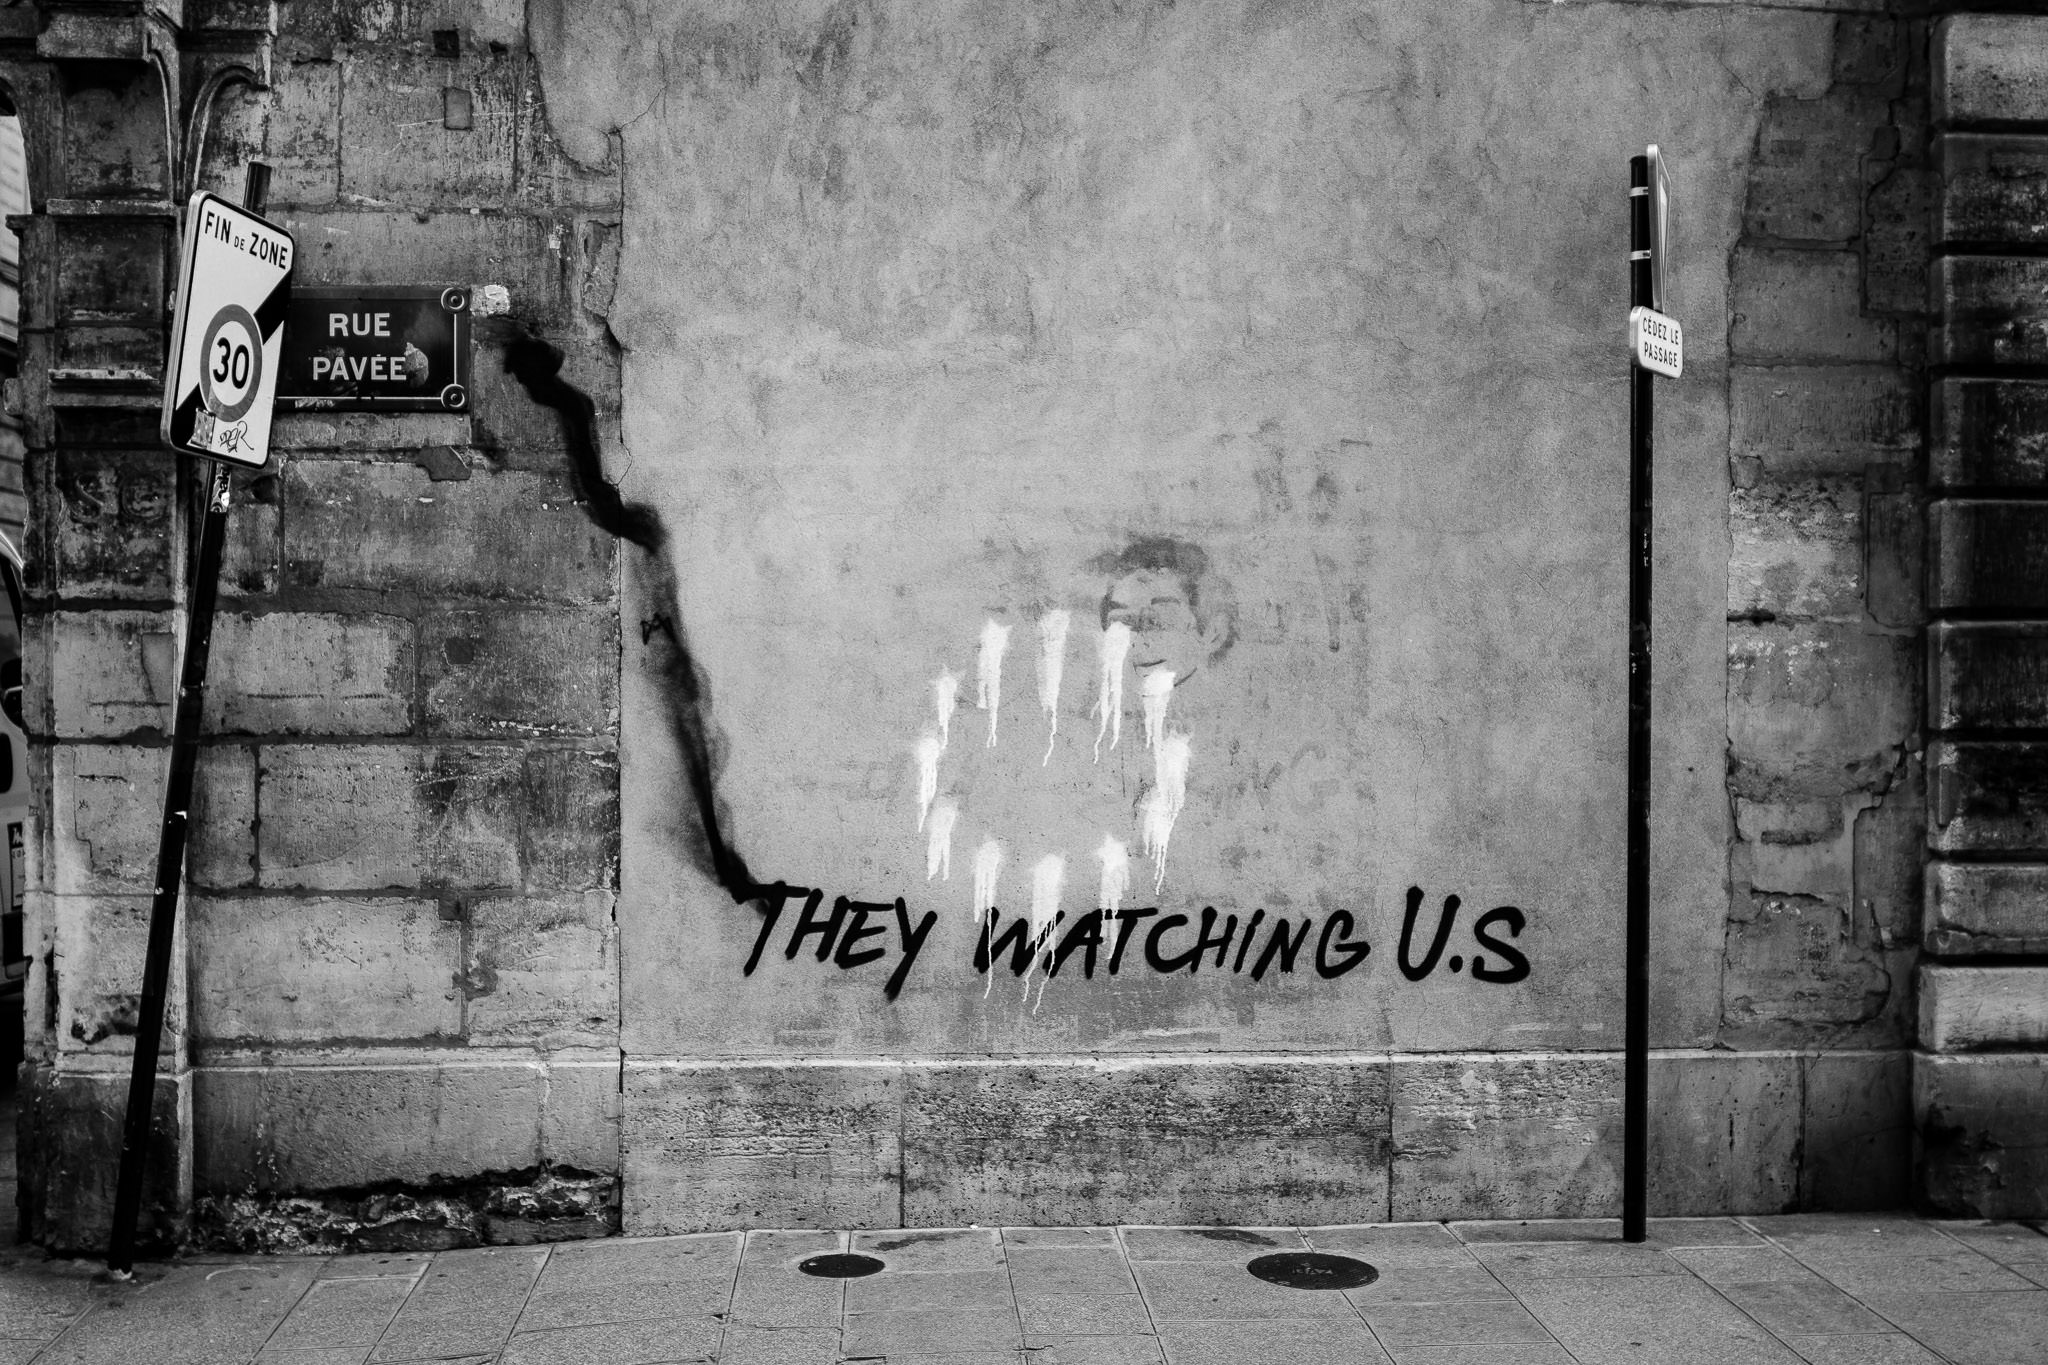
Other times, you may want to use the more imagination-driven nature of black and white photography to your advantage. In the example below, the tight composition eliminates some of the scene’s context. A lack of colors adds to the sensation, making viewers spend a moment longer looking at the photo to recognize what’s going on. This sort of effect is easier to accomplish in black and white than color.

Of course, it is crucial to compose your photos well no matter what, color or black and white. This isn’t something that changes when you convert a photo. Still, when you take pictures in black and white, it helps to think about the scene from a monochrome mindset. When you do, you’ll often find yourself making different decisions about your composition – and that can turn a decent shot into a portfolio piece.
5.7. Emotion
At some level, emotion is the most important part of photography – which makes it the perfect way to round out this list. All the elements we have discussed so far are important primarily because they are tools of emotion; they help you pin down the mood and message of your black and white photos.
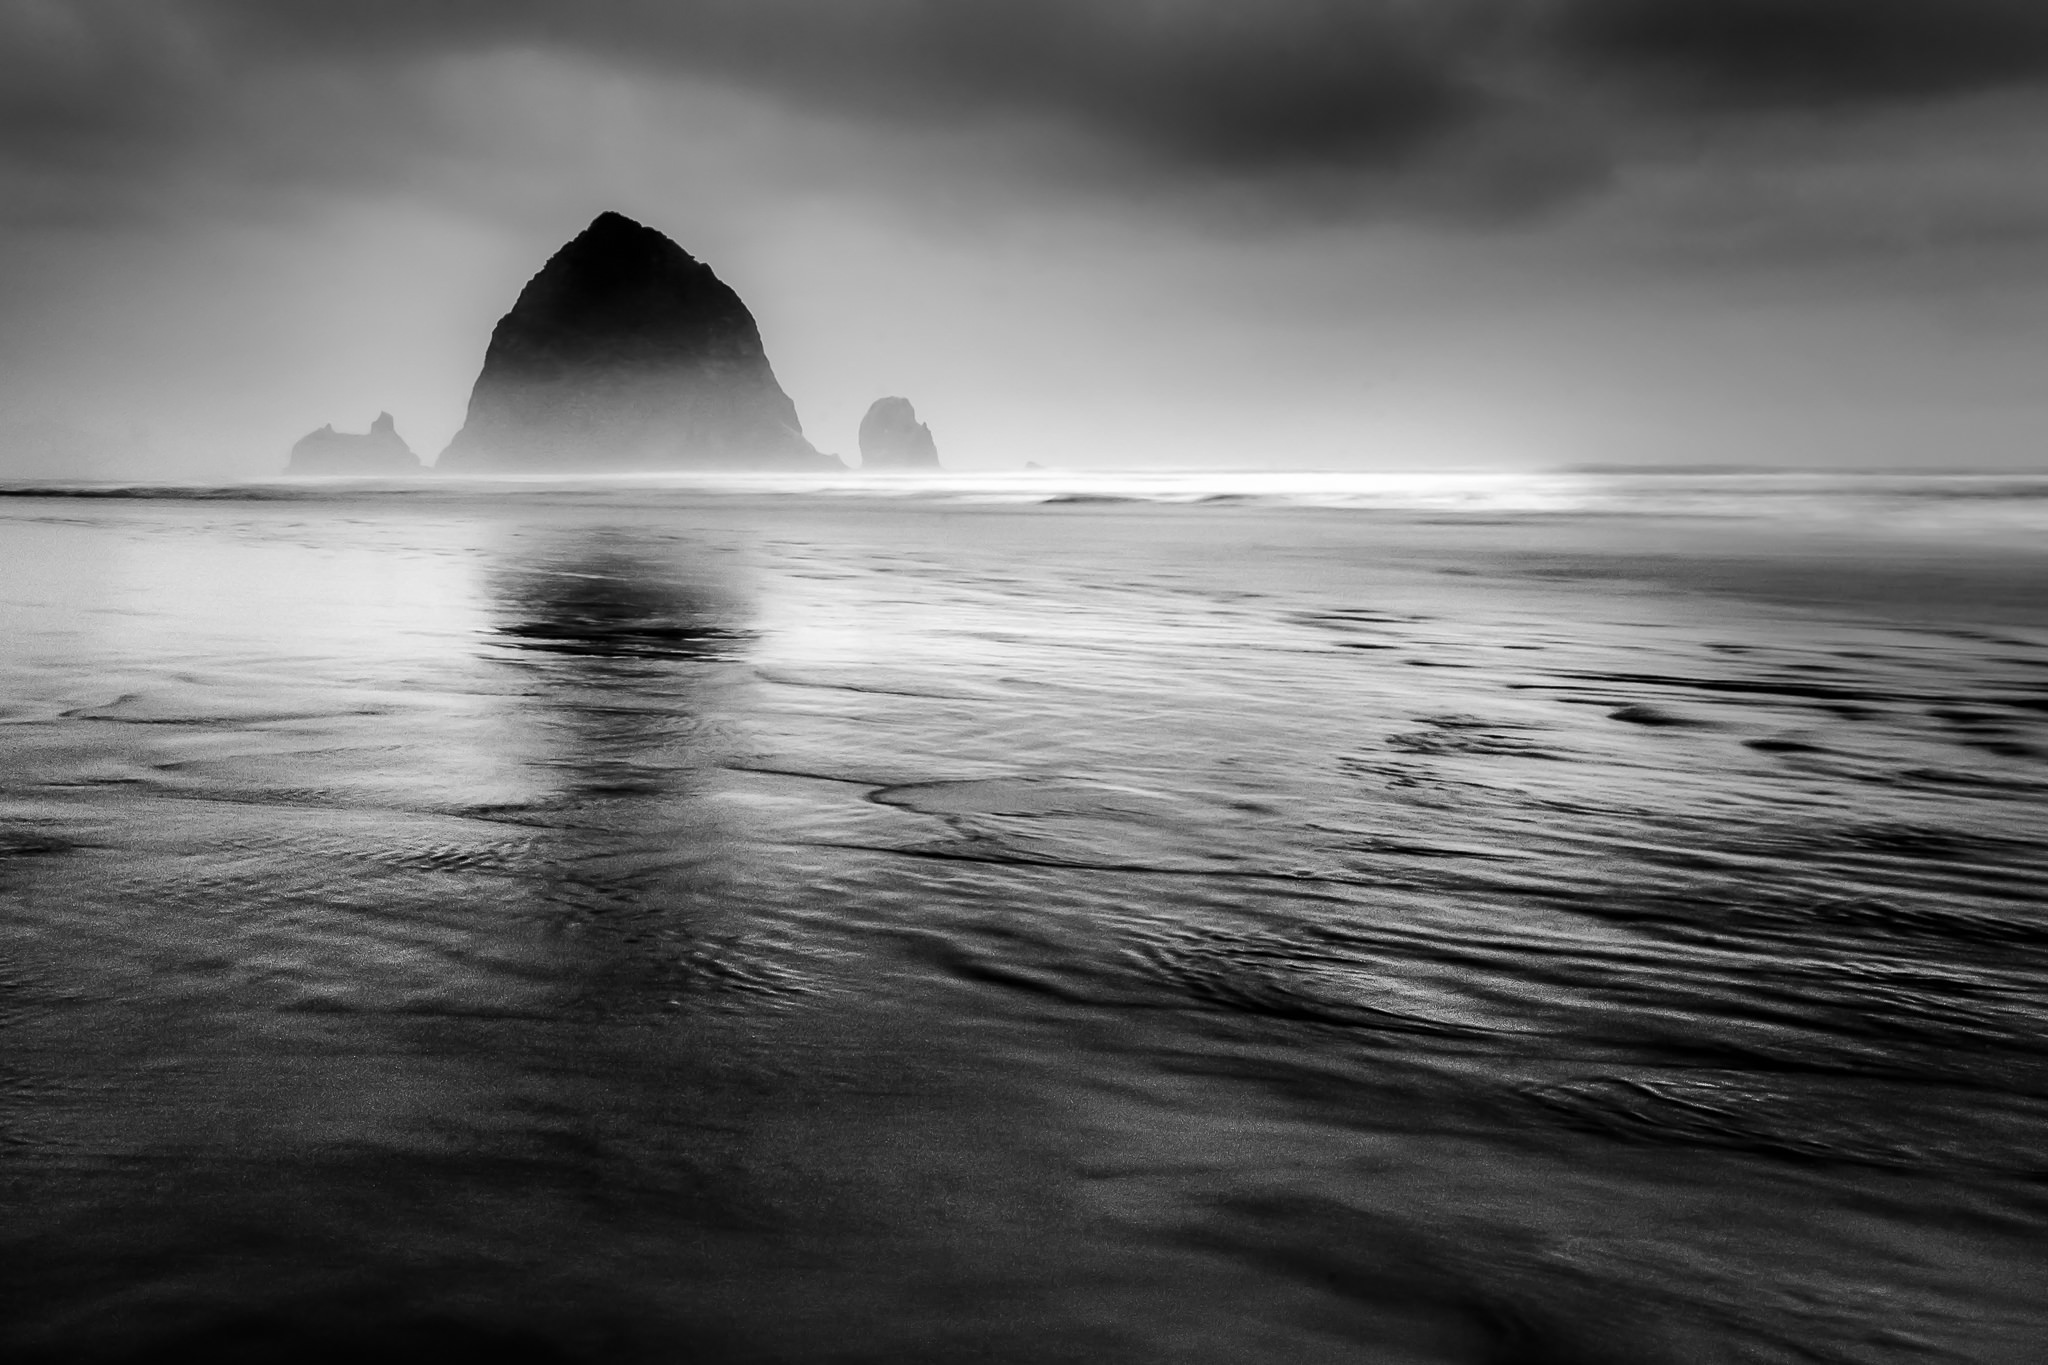
For a case study, take a look at the two photos below, which showcase completely different scenes. The first is an image of architecture in Paris, and the second is a photo of mountains in New Zealand. Yet, despite the vastly different subjects, the emotions of these photos are quite similar:
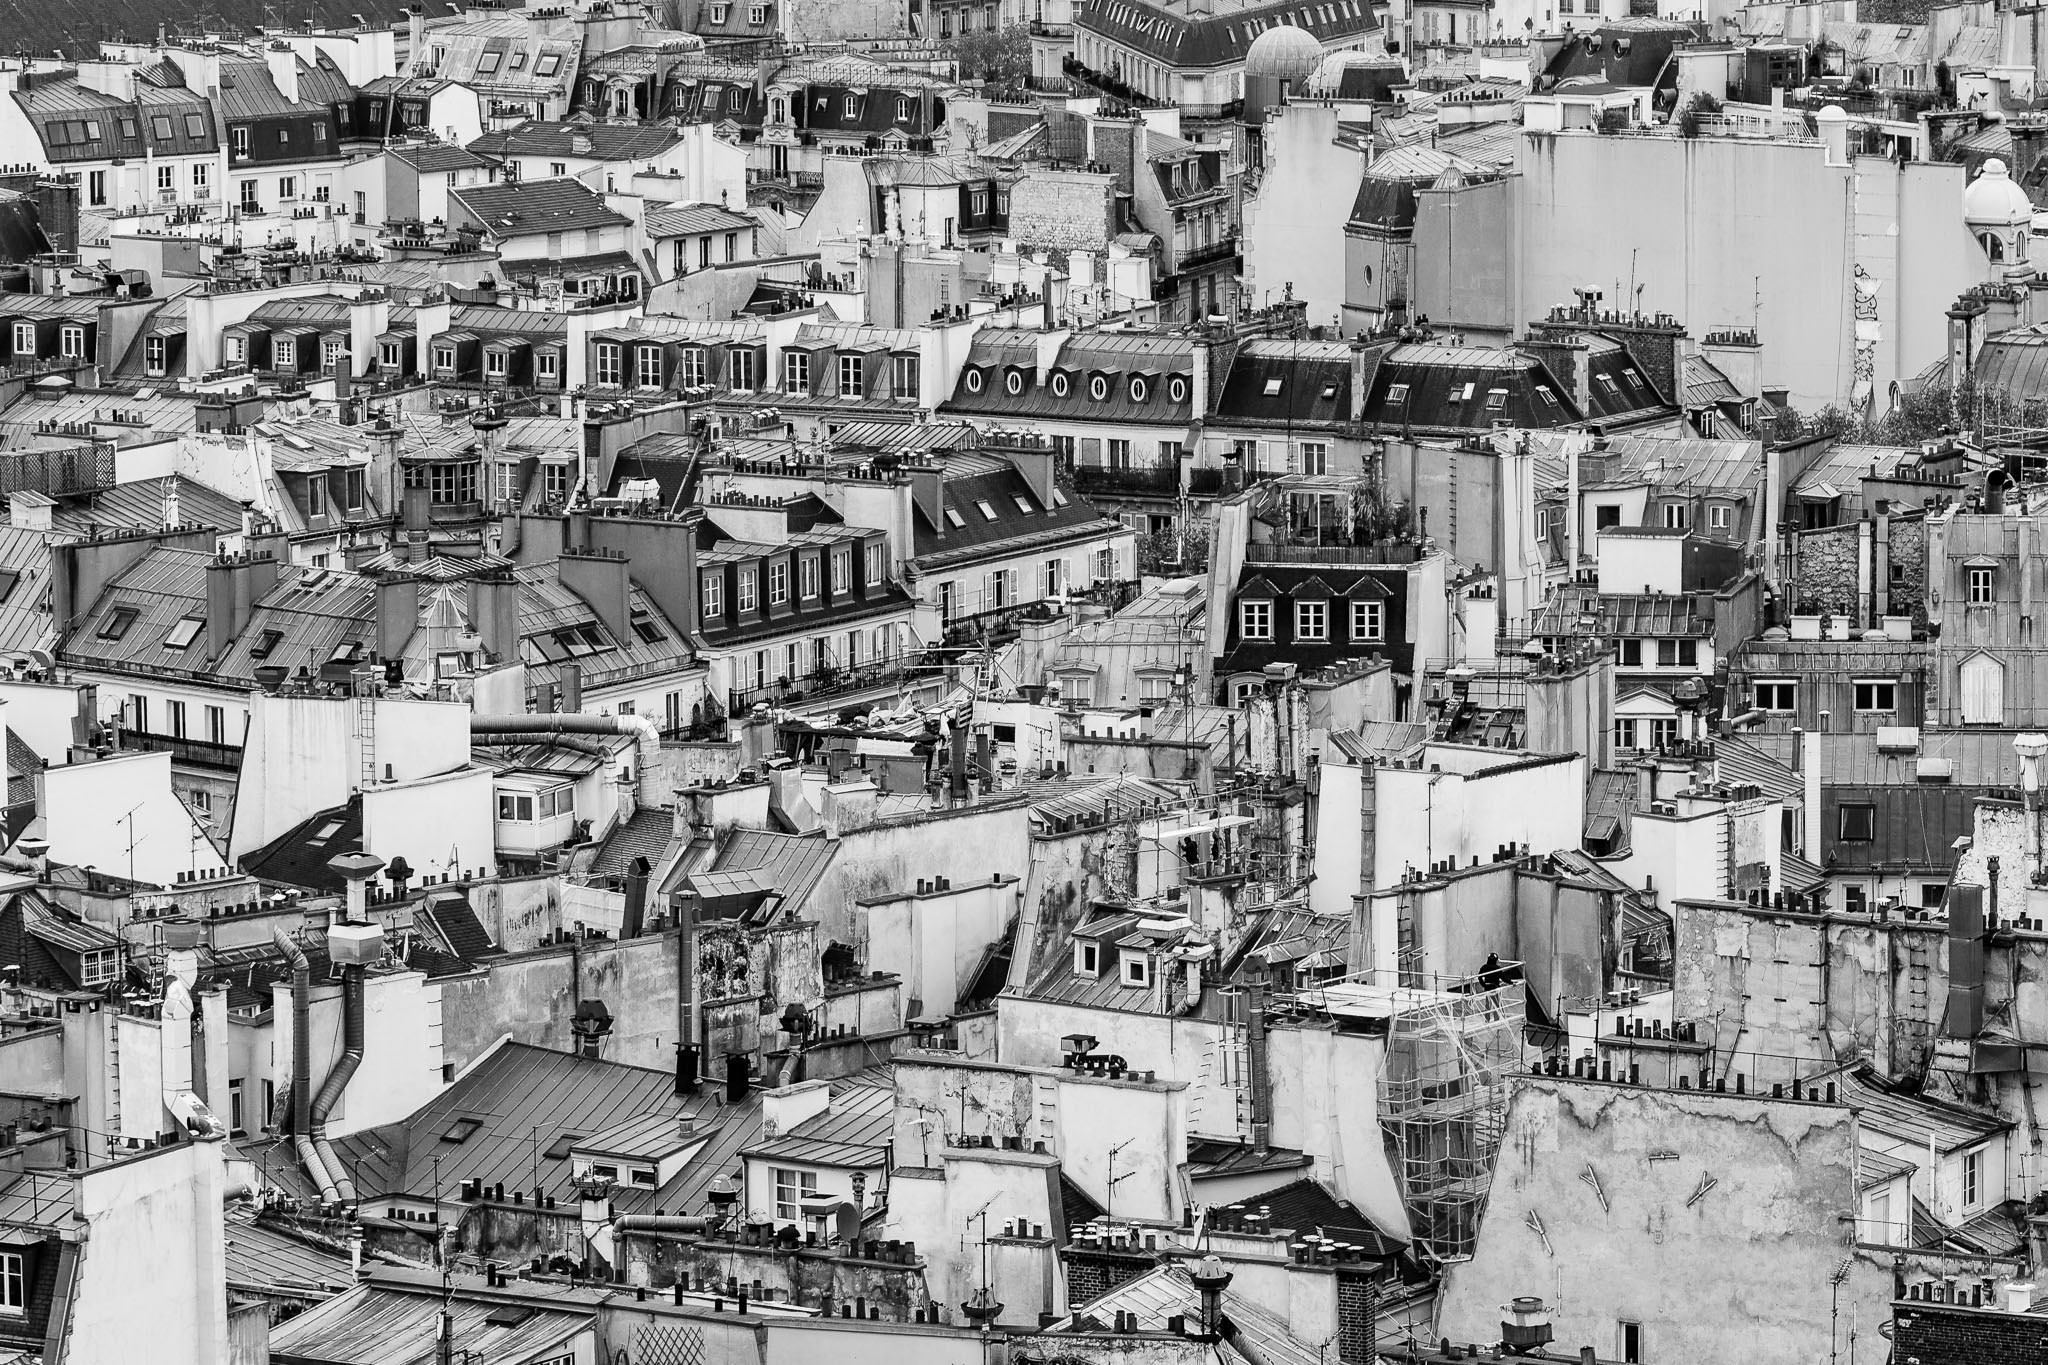
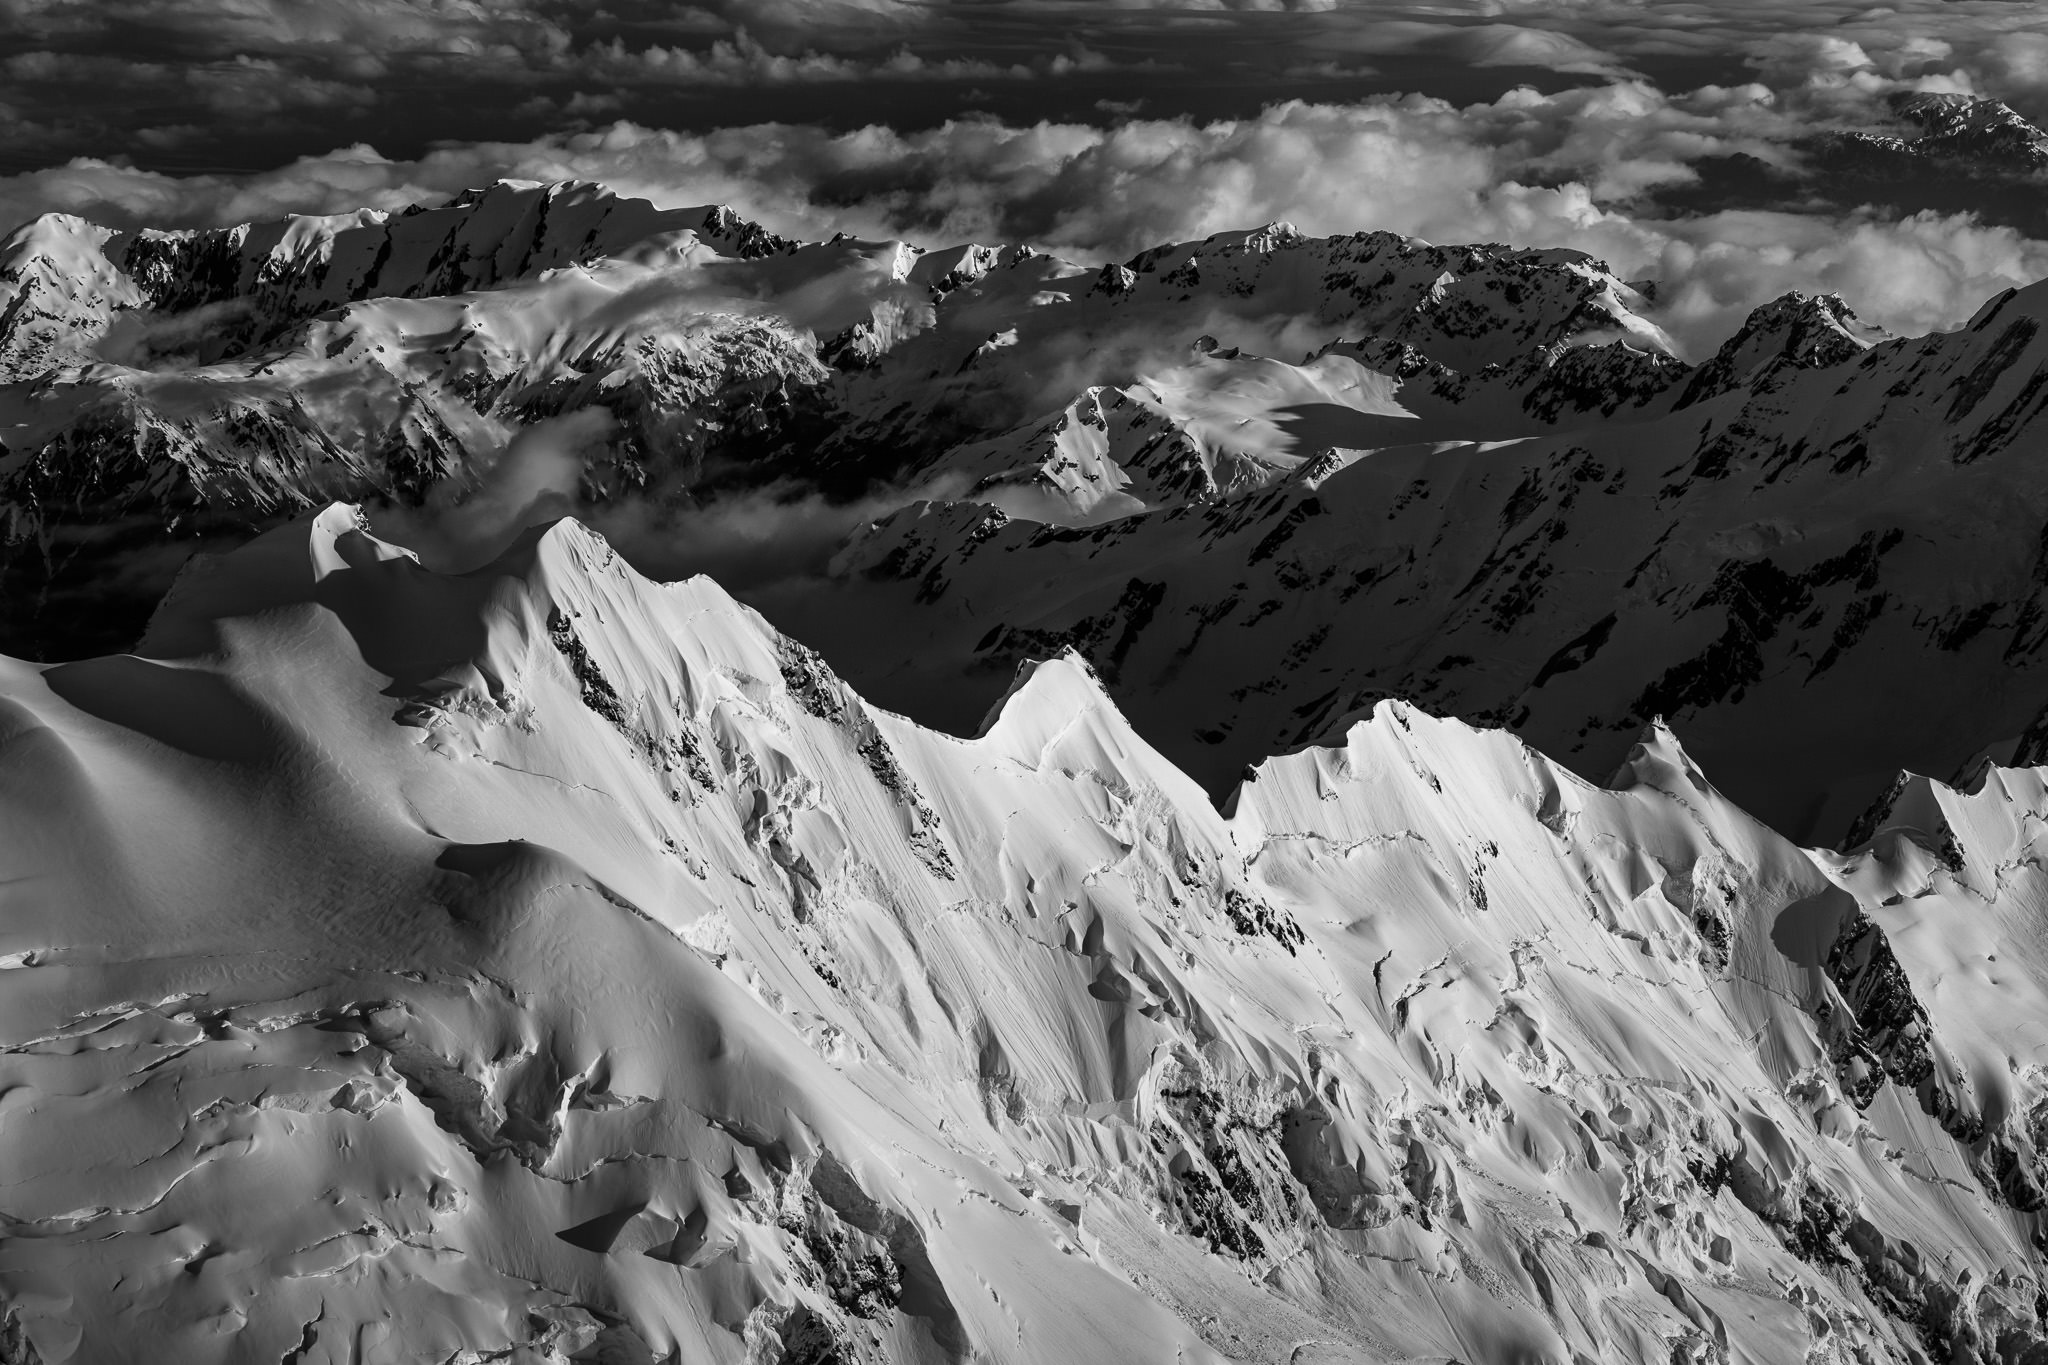
Why is that? Hopefully, the answer is obvious – they are both crowded, high-contrast photos with harsh textures and deep shadows. Both compositions contain similar jumbles of shapes and tones. Who cares that the subjects are different? The feeling of each image is bound to be similar, since their underlying elements are very much alike.
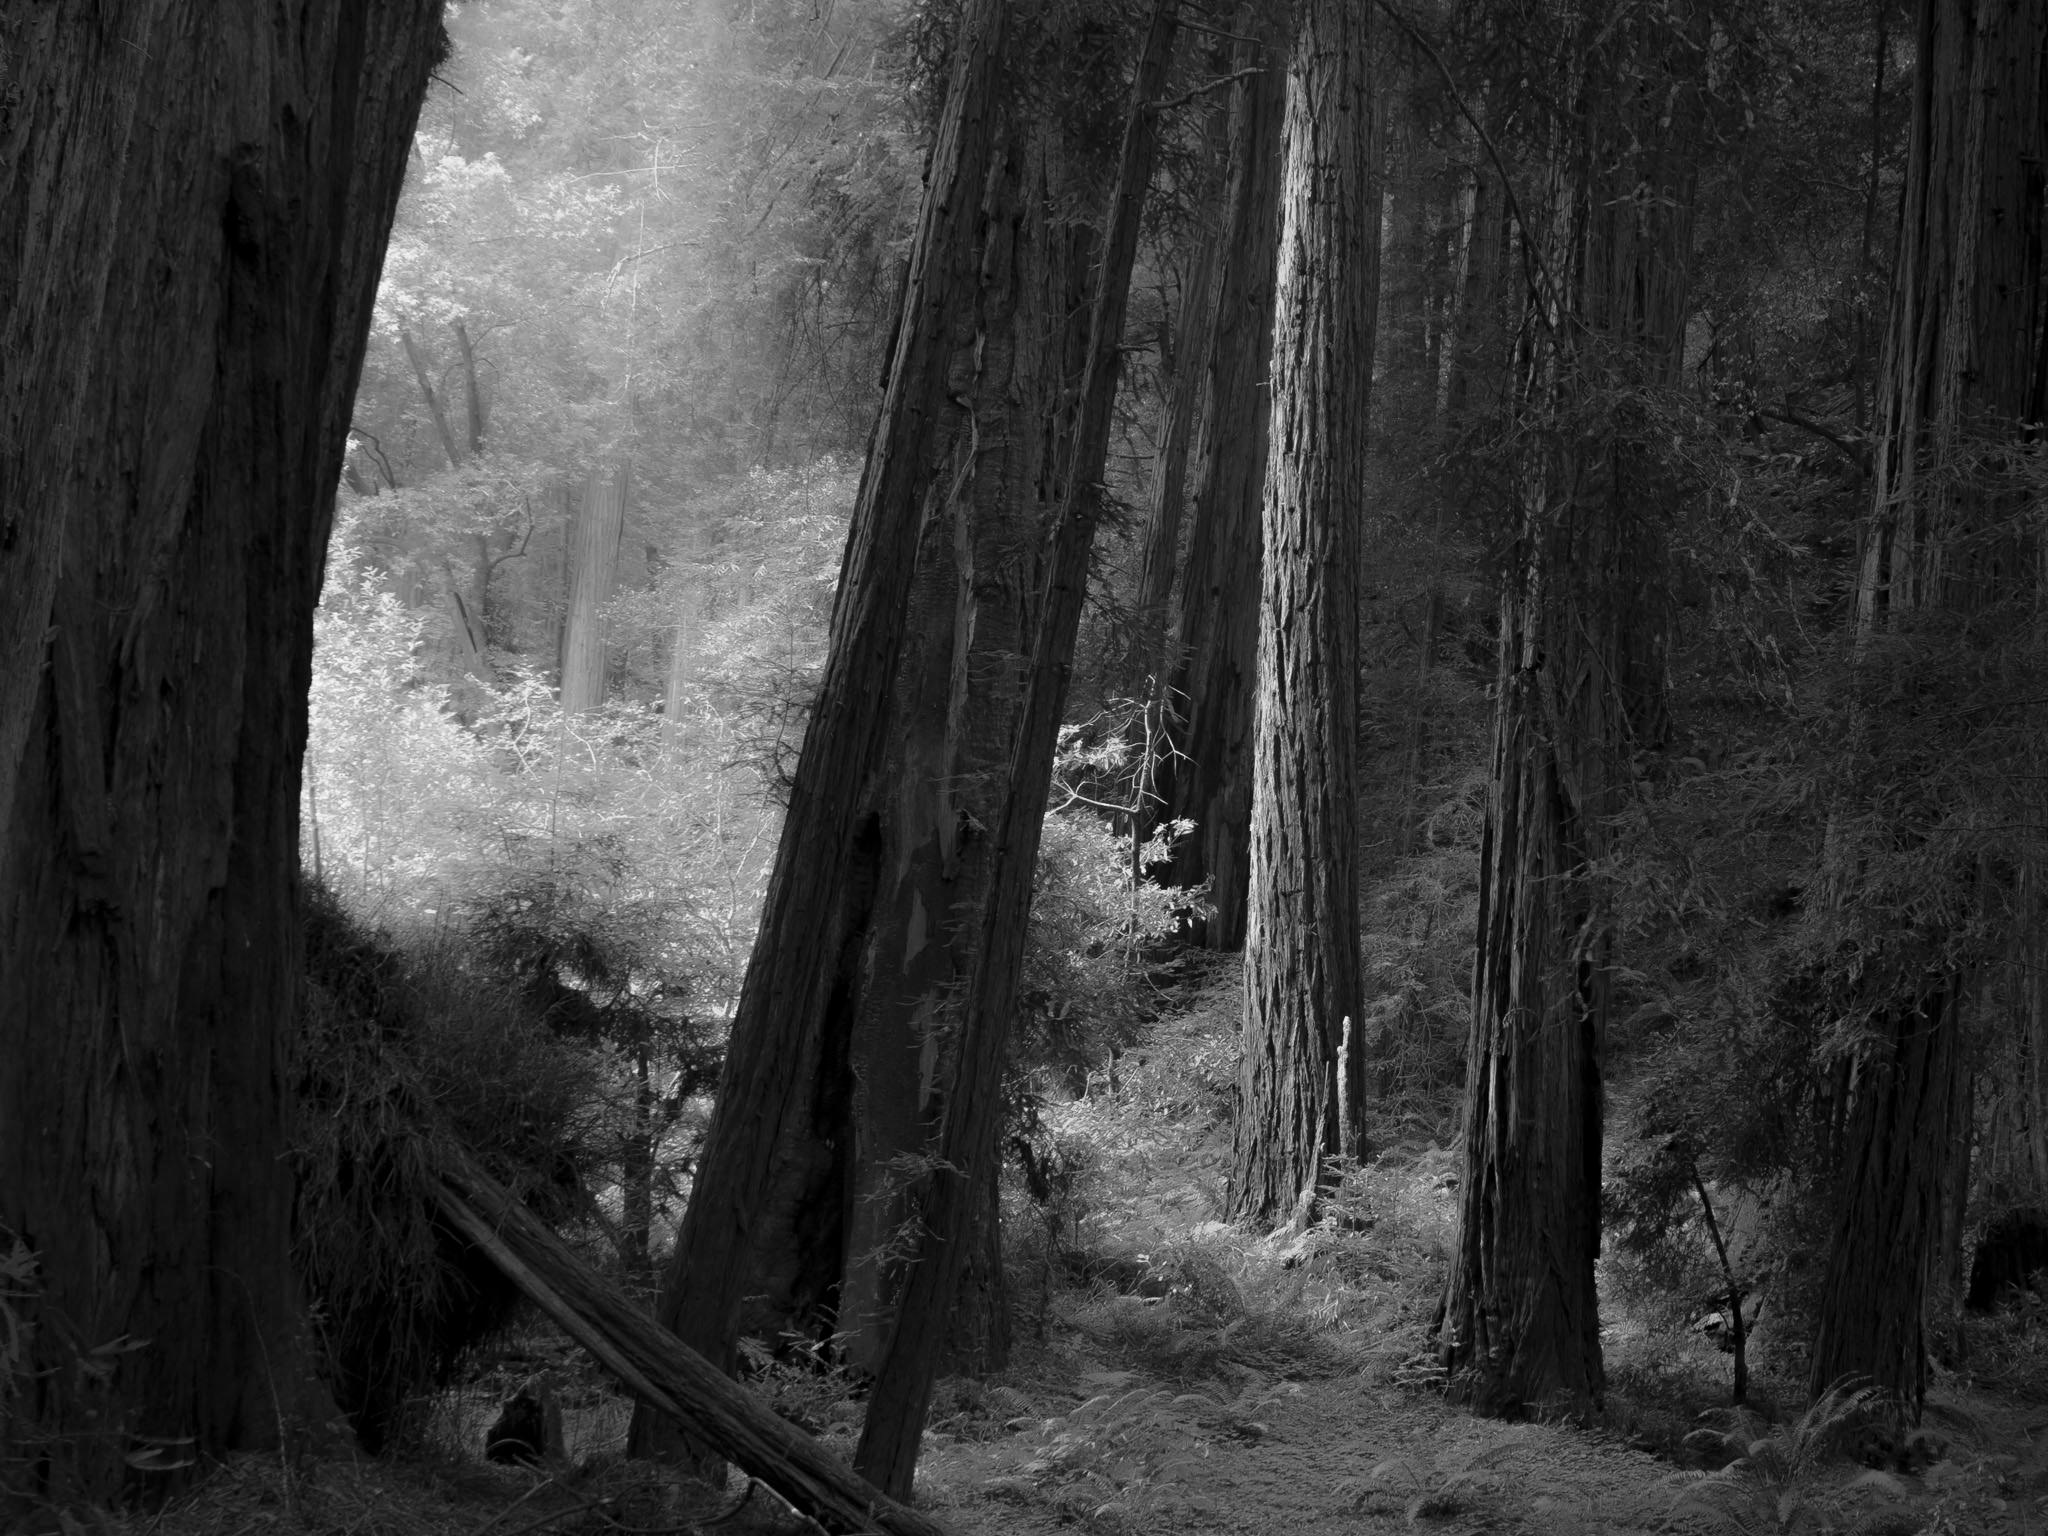
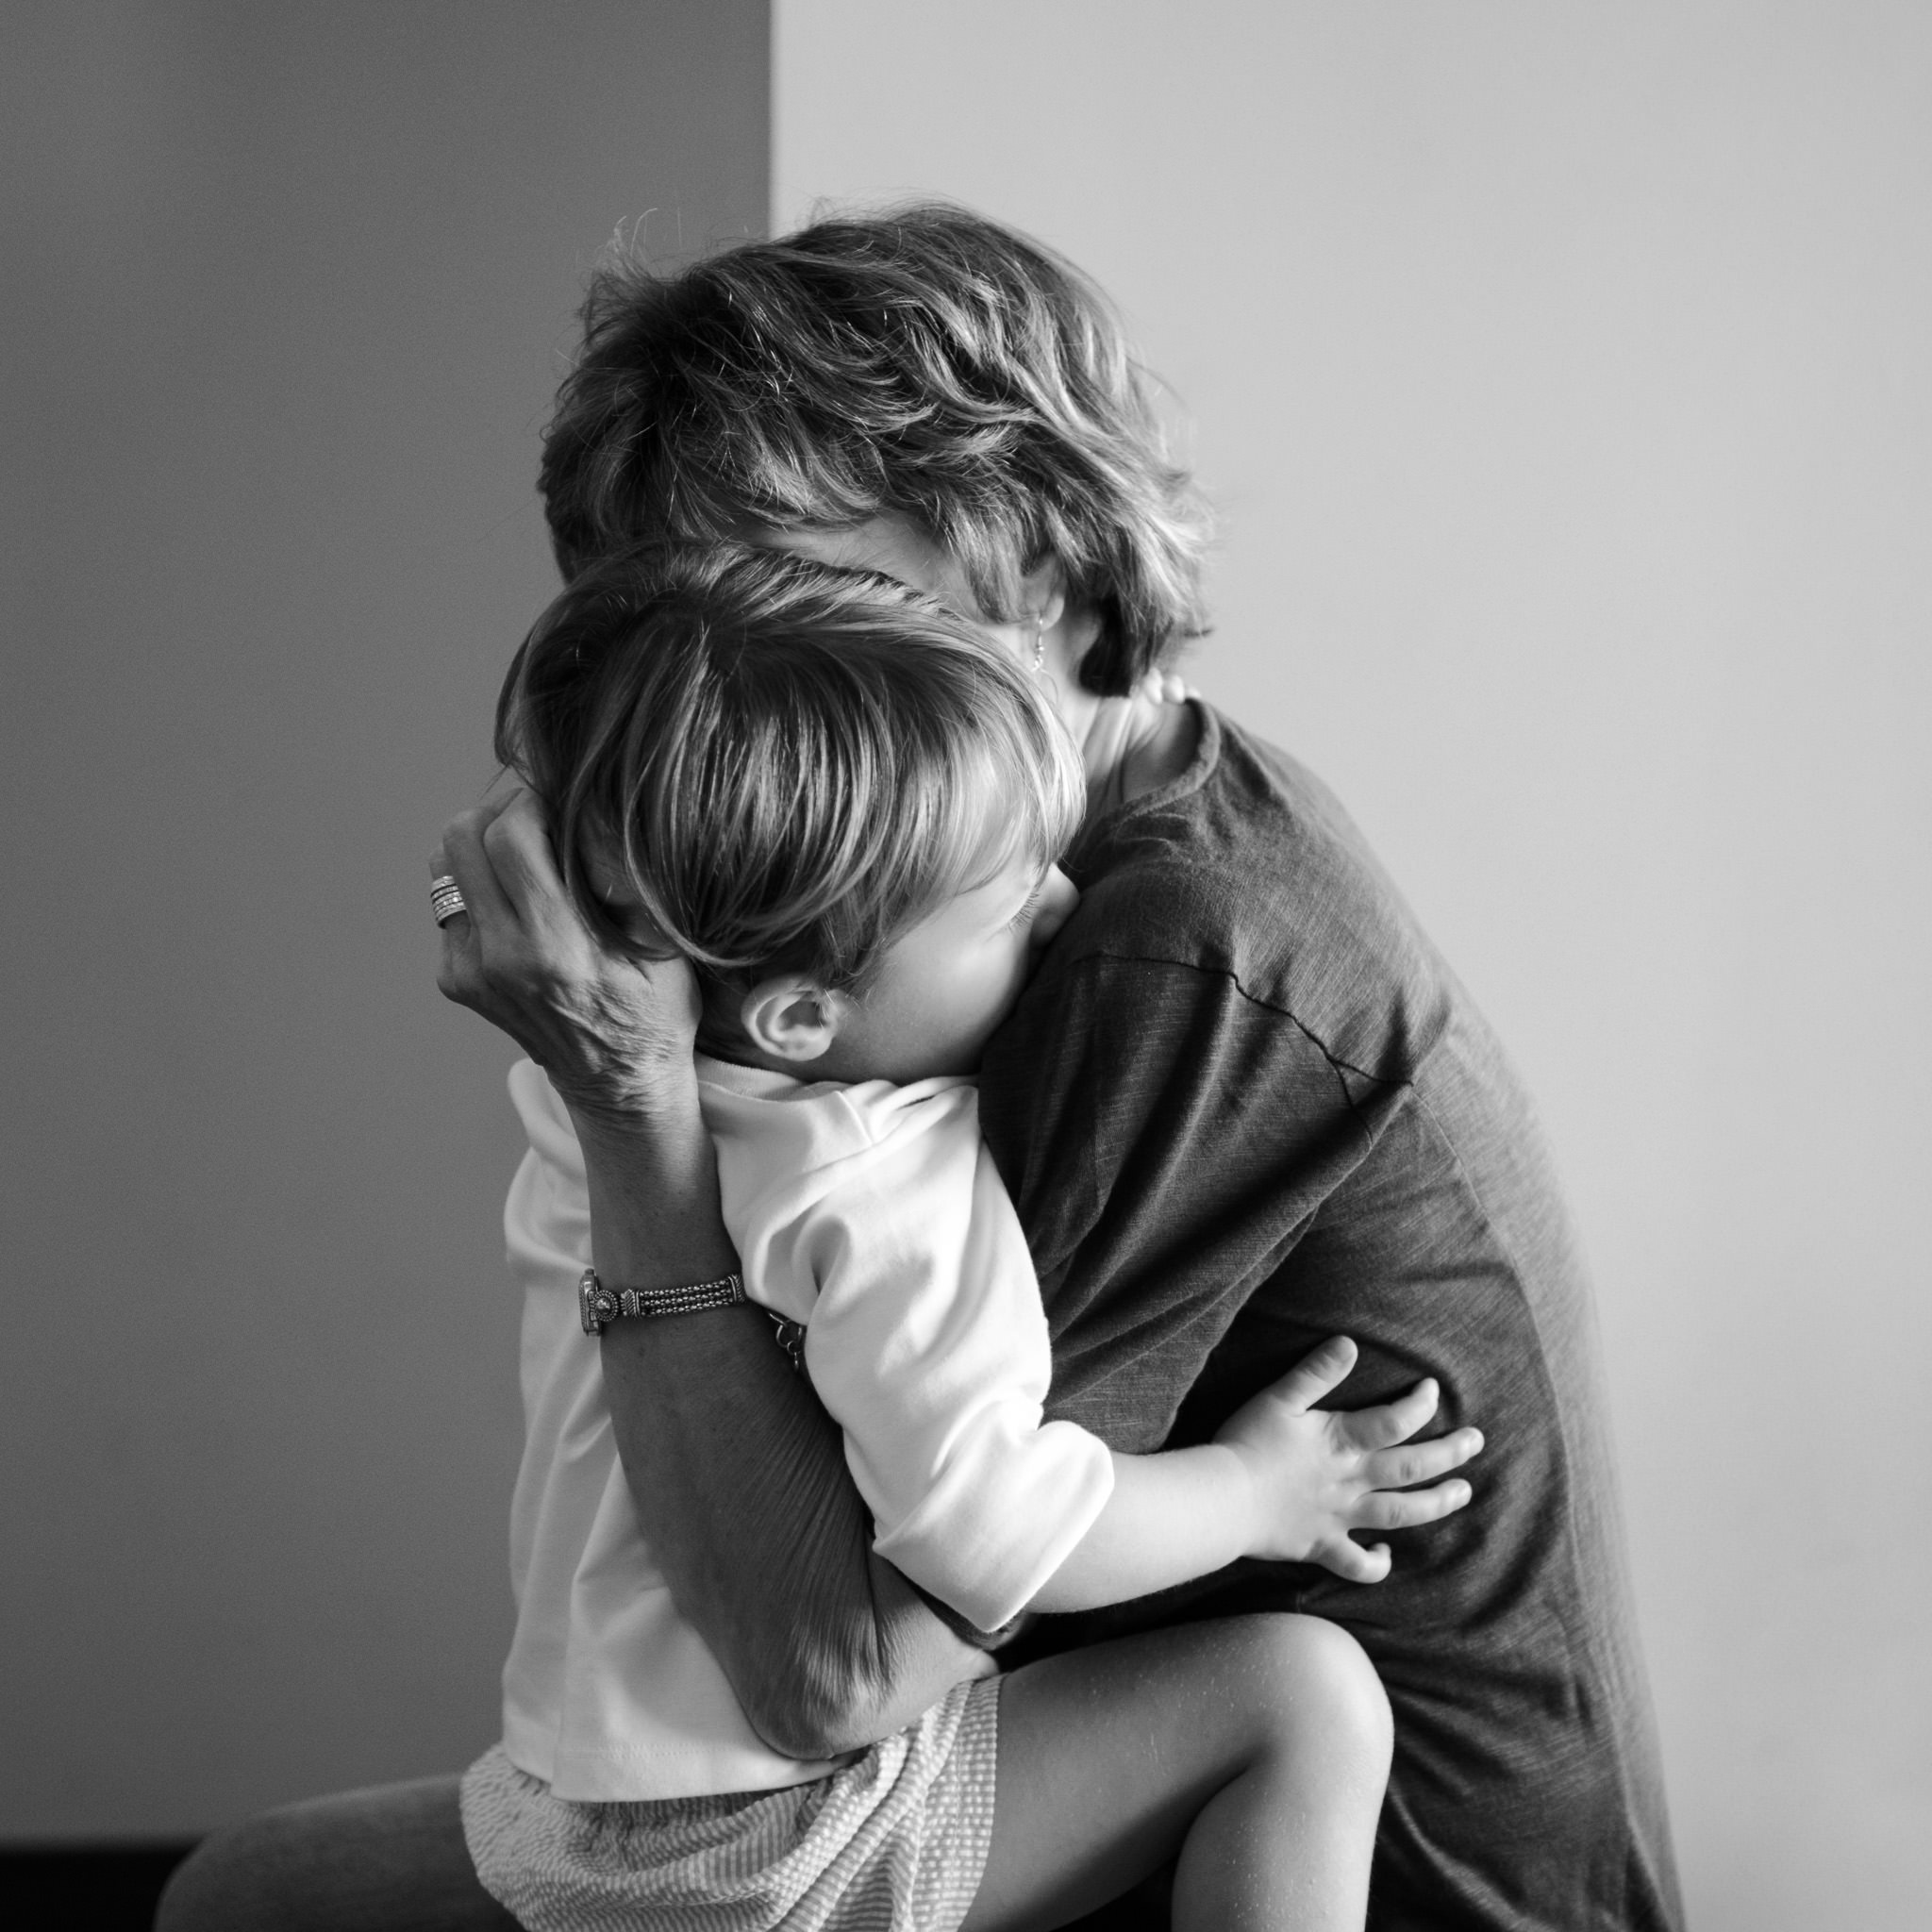
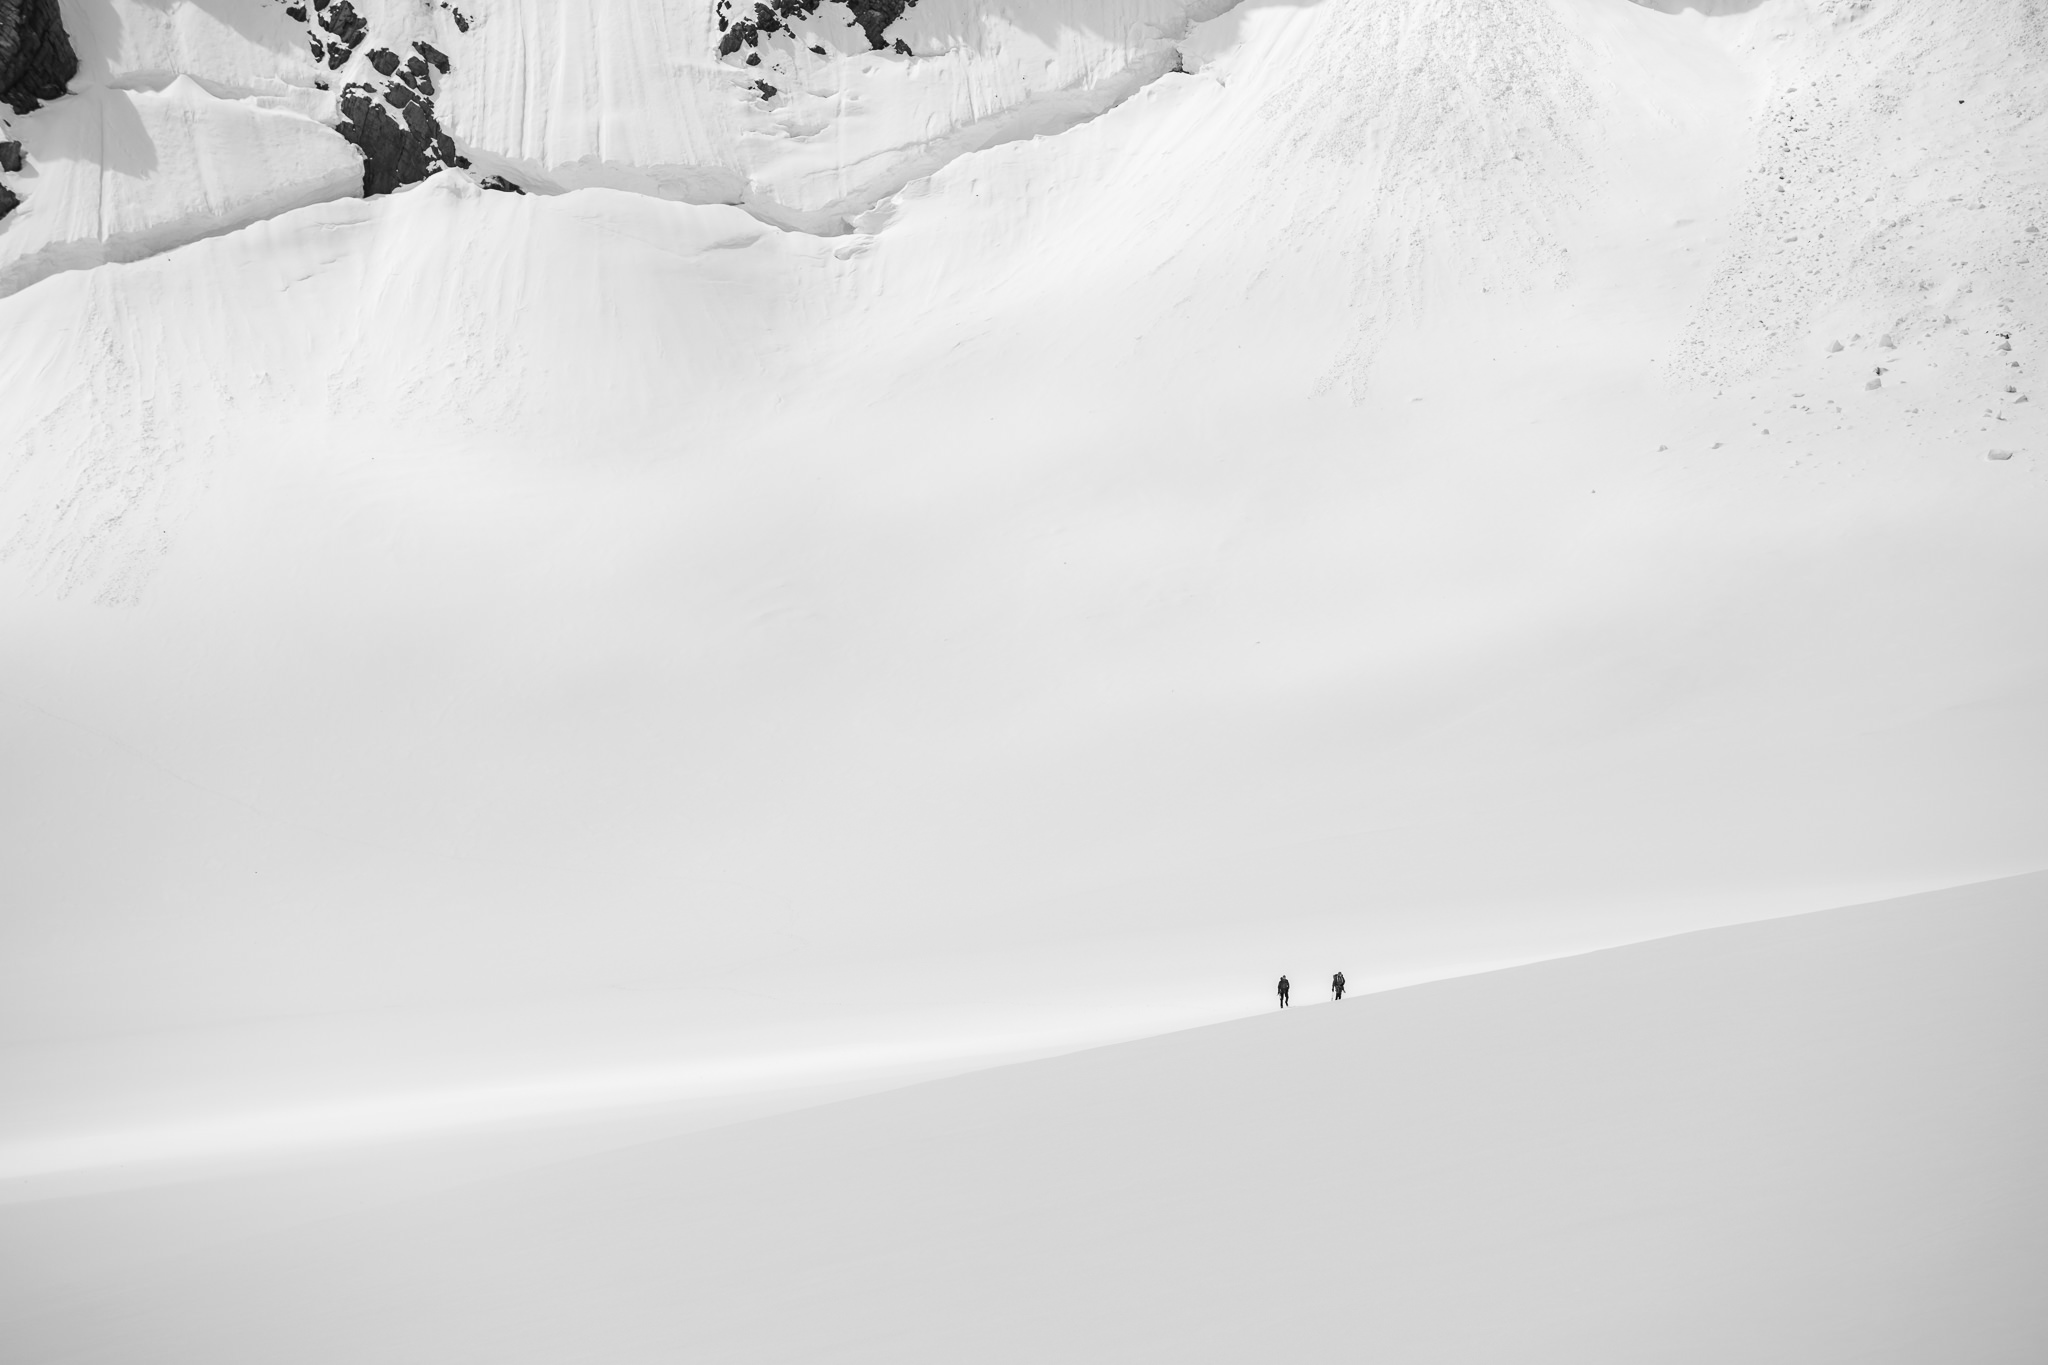
Compare that to the photo below, which is the opposite in many ways. As you would expect from the sparse composition and lack of distractions, the emotion in this photo is completely different – isolated and lonely:
Emotion is not some separate variable that you need to get right in order to capture good black and white photos. Instead, it is the culmination of the tools we have discussed so far. Used well, the other six elements of black and white photography let you sculpt your emotional message in a way that resonates with viewers and shows them something worth seeing.
6. Post-Processing
Let’s take a look at how you can post-process color images to black and white using Lightroom, Photoshop and other software.
6.1. How to Make an Image Black and White in Lightroom
There are a few ways to convert photos to black and white in Lightroom, but the easiest is just to toggle “Black & White” treatment at the very top of the Basic panel, or just press “v” on your keyboard.
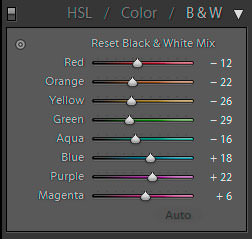
You can also convert a photo to black and white by reducing the saturation to -100, or (with some cameras) by changing the profile under “Camera Calibration” to monochrome. But these methods are not optimal, since they eliminate some options under the HSL tab to adjust individual colors in the black and white mix.
Although the HSL tab is very valuable for fine-tuning black and white photos, be aware that extreme adjustments frequently add high levels of noise to your images. This can be minimized somewhat in the noise reduction panel (specifically the “color noise” reduction), but it is best just to keep your adjustments minimal.
6.2. How to Make an Image Black and White in Photoshop
You have even more flexibility converting a black and white photo in Photoshop than in Lightroom, to the degree that everyone has a different preferred method. Personally, I like using the “Camera RAW Filter” in Photoshop CC, which opens up the same editing options found in Lightroom and applies them as a filter. That’s because I like Lightroom’s HSL adjustments for black and white photos quite a bit!
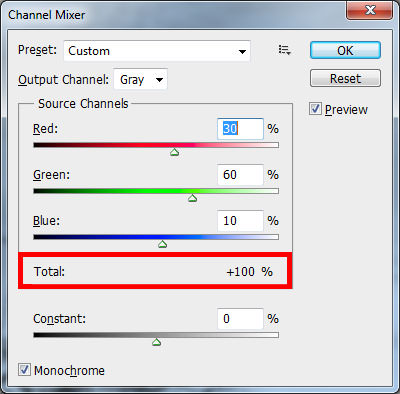
Still, you have plenty of other options as well. One popular method is to create a “channel mixer” adjustment layer, which gives you control over the red, blue, and green channel in your black and white image.
You can also go with a black and white adjustment layer, decrease saturation completely, or even open the photo in a plugin that does black and white conversion. In short, there are many ways to get a black and white image in Photoshop, and it’s helpful to test out some of these methods for yourself to decide which one you like the best.
6.3. Converting Photos in Other Post-Processing Software
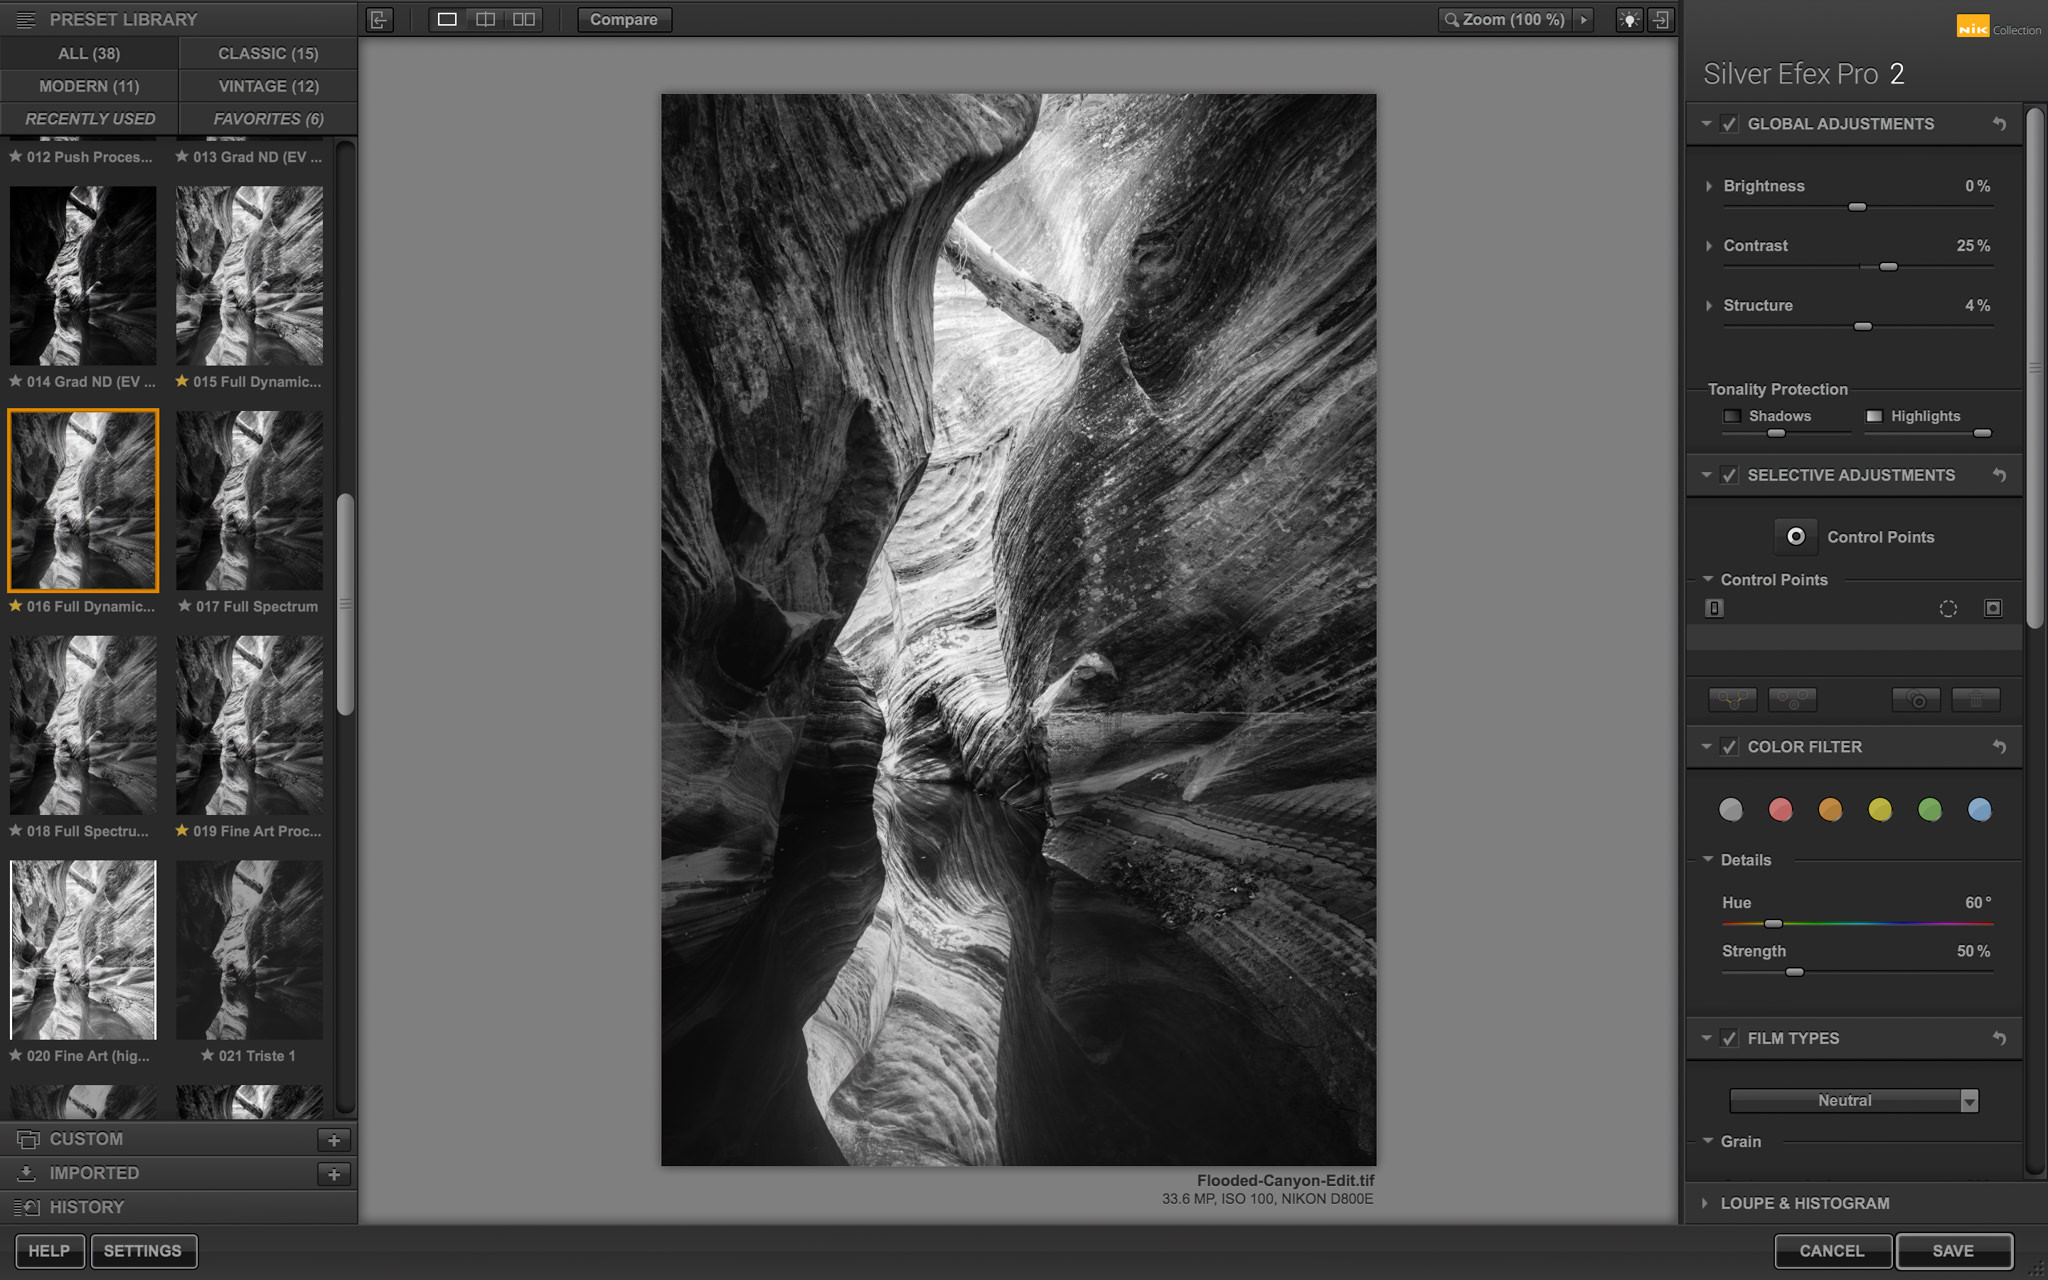
These days, it is very popular to use dedicated, third-party software to convert a photo to black and white. The most popular is Nik Silver Efex Pro, which many photographers already happen to own, since it was free for a few years in a row. (It now costs $70 as part of the Nik bundle, since DxO bought it from Google.) It works on its own, or as a plugin for Lightroom and Photoshop.
Personally, I tend not to use Silver Efex Pro or other third-party conversion software, since saving the black and white version eliminates color information, meaning that there is no way to convert back to color from that point on. (Though you can always re-edit the original RAW for a color version.) Still, software like Silver Efex does a noticeably better job of handling extreme adjustments without adding noise, so it can be very useful for some photos. And there is no denying that plugins like this have much more flexibility than Lightroom’s built-in options.
7. Inspiration and Ideas
If you want to take some great black and white photos, just go out and do it! The best way to improve your skills is to practice, both in the field and in post-production. Soon, you’ll find yourself looking at the world in monochrome, visualizing exactly how the scene in front of you will look in black and white. Here are a few brief ideas to get you started.
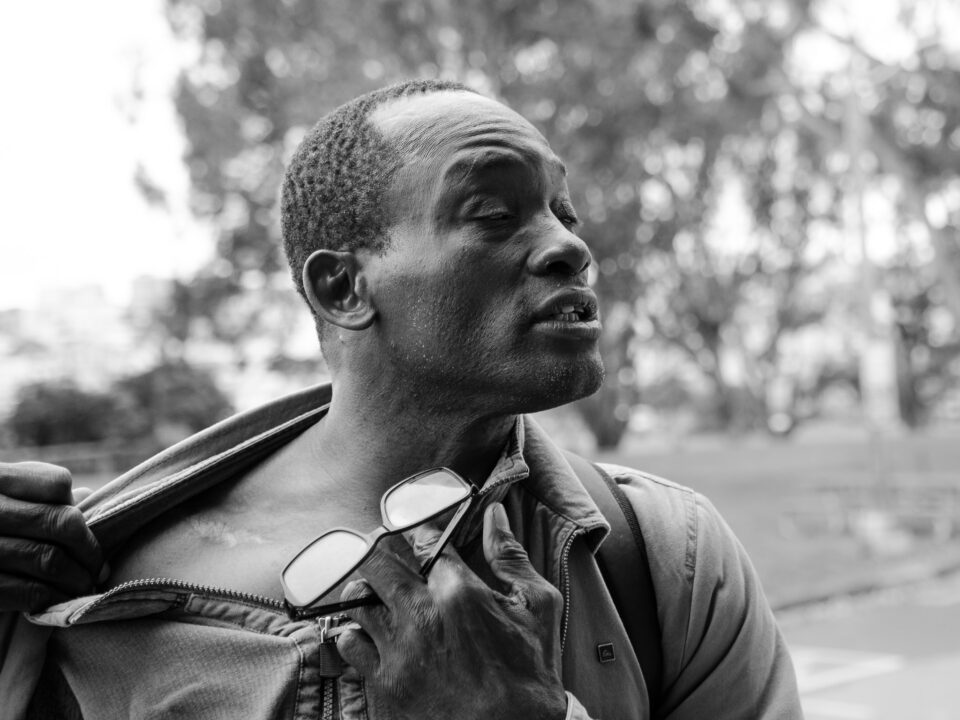
7.1. Black and White Portrait Photography
Because of how accessible portrait photography is, it’s one of the best ways to start taking black and white pictures. Pay special attention to the interplay of light and shadows when you take monochromatic portraits. You can use careful lighting to sculpt the shape of your subject’s face or draw attention to certain features, such as the look in their eyes or the texture of their hands. Done well, the results will speak volumes.
Also, you can use black and white as a way to distill your subject’s emotions. If you shoot color portraits, any clothing in the photo may draw more attention than it should, taking away from your message. Monochrome helps you focus on things like facial expressions and gestures instead.
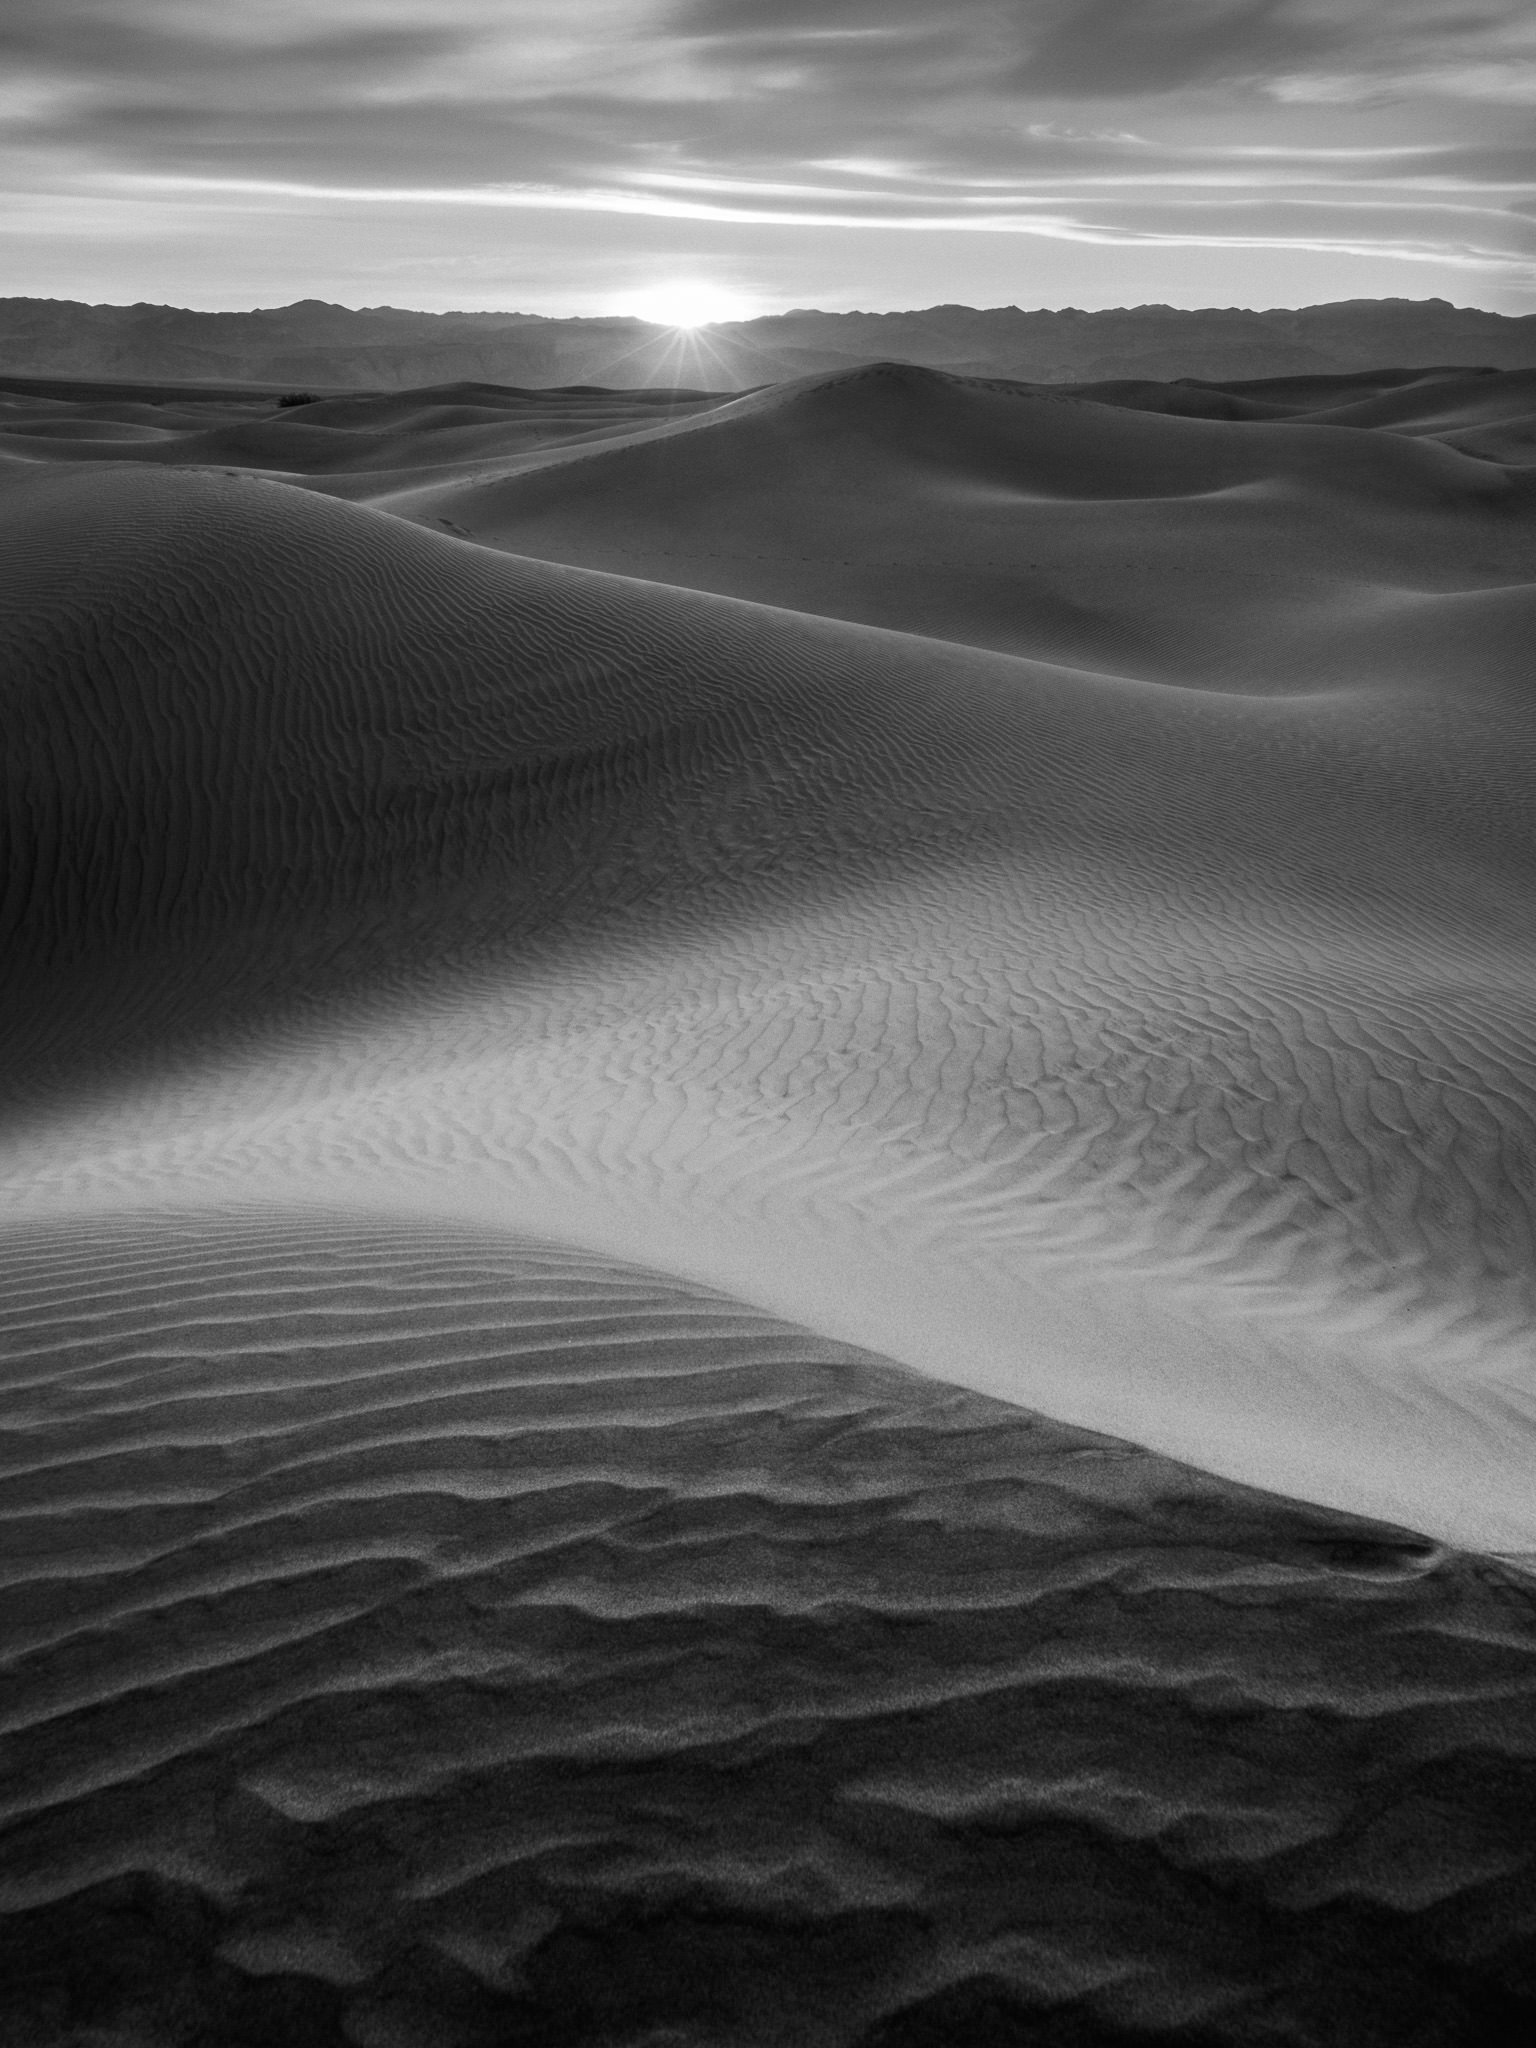
7.2. Black and White Landscape Photography
Monochromatic landscape pictures have a sense of rawness that helps them draw attention. They rely on the fundamental characteristics of the scene – light and land – to tell a story. Along with that, it is common for landscapes with countless colors to become unruly, distracting from the message you want to convey. Often, black and white is the best solution.
Still, there will be times when the colors in a landscape are perfectly fine, but the image still looks better in black and white. That’s because, as a photographer, you are often trying to capture the essence of a scene more than just a precise replica of what you saw. Sometimes, that essence is more about shadow, texture, shape, and contrast than it is about particular hues.
7.3. Black and White Street Photography
Last is street photography – perhaps the only genre of photography where people are more likely to shoot in monochrome than in color. Why would this be?
In some sense, it is down to the history of street photography. People like Henri Cartier-Bresson and Vivian Maier captured street life exclusively in black and white, and their influence has carried over to many people taking pictures today.
But at a deeper level, color can distract from street scenes in a way that is rarer in other genres. If you want viewers to focus on an interaction or subtle visual pun that you have captured, you certainly wouldn’t want to draw their eye away from the action with splashes of color (particularly in cities, where the position of colors in the frame is often haphazard). This is not to say that all good street photography must be black and white, but it shouldn’t be surprising that so much of it is.
8. Conclusion
Black and White Photography is deceptively difficult. Although you don’t have as many variables to juggle when you remove color, you’re creating a new challenge instead: taking powerful photos without an important tool at your disposal! If you shoot regular photos in color, you might be able to rely upon vivid clouds at sunset in order to capture a striking image. Or, for portrait photography, you can make your subject more lifelike by depicting the color of their eyes, hair, and skin with a greater sense of realism.
None of that is possible with black and white photography. Instead, you need to work with light, shadow, and the elements of composition to tell a story and capture the emotions you have in mind. Although that takes practice, it is worth the effort. Some messages are simply meant to be conveyed in monochrome.
